
| 일 | 월 | 화 | 수 | 목 | 금 | 토 |
|---|---|---|---|---|---|---|
| 1 | 2 | 3 | 4 | 5 | 6 | |
| 7 | 8 | 9 | 10 | 11 | 12 | 13 |
| 14 | 15 | 16 | 17 | 18 | 19 | 20 |
| 21 | 22 | 23 | 24 | 25 | 26 | 27 |
| 28 | 29 | 30 |
- 자료구조
- Docker
- 알고리즘
- 실전 자바 고급 1편
- 스레드
- 인프런
- 데이터베이스
- Thread
- lambda
- 동시성
- 함수형 인터페이스
- 쿠버네티스
- container
- 컨테이너
- 자바 입출력 스트림
- 김영한
- RDB
- 도커 엔진
- SQL
- Kubernetes
- 쓰레드
- 일프로
- java
- replicaset
- mysql
- 람다
- 시작하세요 도커 & 쿠버네티스
- 자바
- db
- 도커
- Today
- Total
쌩로그
Practical Testing 실용적인 테스트 가이드 - Section 05. Spring & JPA 기반 테스트 (1) - Persistence Layer 본문
Practical Testing 실용적인 테스트 가이드 - Section 05. Spring & JPA 기반 테스트 (1) - Persistence Layer
.쌩수. 2024. 1. 18. 07:31목록
- 포스팅 개요
- 본론
2-1. 레이어드 아키텍처(Layerd Architecture)와 테스트
2-2. Persistence Layer 테스트 - 요약
1. 포스팅 개요
인프런에서 박우빈님의 Practical Testing: 실용적인 테스트 가이드 강의 섹션 5 Spring & JPA 기반 테스트 중 Persistence Layer(Repository 계층) 테스트 부분을 학습하며 정리한 포스팅이다.
| 참고 이전 포스팅
참고로 JPA에 대한 개념과 스프링의 개념을 설명하신 부분이 있었지만 생략했고, 중간에 키워드는 적어두었다.
2. 본론
2-1. 레이어드 아키텍처(Layerd Architecture)와 테스트
Layered Architecture
관심사를 분리해서 책임을 나우고, 유지보수하기 용이하도록 계층을 나누어놓은 아키텍쳐다.
계층은 다음과 같이 나뉜다.
- Presentation Layer
- Business Layer
- Persistence Layer
지금까지는 단위 테스트에 대한 예기만 했었지만, 단위 테스트만으로는 커버하기 어려운 영역들이 생긴다.
그래서 필요한 것이 통합 테스트(Integration test)이다.
다음과 같은 상황이 있다고 가정하자.
A 모듈과 B 모듈이 있다고 가정했을 때,
(이 때 모듈은 하나의 클래스가 될 수도 있고, 여러 클래스가 모인 하나의 기능일 수도 있다.)
이 A 모듈과 B 모듈이 협력해서 하나의 기능을 동작하게 할 때
AB라는 기능을 하는지, 혹은 BA라는 기능을 하는건지, 혹은 전혀 다른 C기능을 하게되는 건지 예측을 할 수 없다.
우리가 예상한 결과는 AB이지만, 결과가 AB라는 보장을 할 수 없기 때문에 통합테스트를 해봐야 한다.
통합 테스트
- 여러 모듈이 협력하는 기능을 통합적으로 검증하는 테스트다.
- 일반적으로 작은 범위의 단위 테스트만으로는 기능 전체의 신뢰성을 보장할 수 없다.
- 풍부한 단위 테스트 & 큰 기능 단위를 검증하는 통합 테스트다.
이번 챕터를 통해서 각 Layer별로 어떻게 통합 테스트를 하면 좋을지 알아본다.
(이번은 Persistence Layer이다.)
## 2-2. Spring / JPA 흝어보기 & 기본 엔티티 설계

라는 챕터가 있어 정리하려고 했으나,
IoC, DI, AOP, ORM, JPA 의 개념에 대해 짚고 넘어 가는 챕터라서
정리하려 했으나, 굳이라서 그냥 넘어간다.
2-2. Persistence Layer 테스트
요구사항
요구사항이 다음과 같다고 가정한다.
- 키오스크 주문을 위한 상품 후보 리스트 조회하기
- 상품의 판매 상태 : 판매중, 판매보류, 판매중지
- 판매중, 판매보류인 상태의 상품을 화면에 보여준다.
- 화면에서 필요한 정보는 id, 상품 번호, 상품 타입, 판매 상태, 상품 이름, 간격 등이 있다.
Entity
// BaseEntity

@MappedSuperclass
@Getter
@EntityListeners(AuditingEntityListener.class)
public abstract class BaseEntity {


    @CreatedDate
    private LocalDateTime createdDateTime;

    @LastModifiedBy
    private LocalDateTime modifiedDateTime;
}

// Product
@Getter
@NoArgsConstructor(access = AccessLevel.PROTECTED)
public class Product extends BaseEntity {

    @Id
    @GeneratedValue(strategy = GenerationType.IDENTITY)
    private Long id;

    private String productNumber;

    @Enumerated(EnumType.STRING)
    private ProductType type;

    @Enumerated(EnumType.STRING)
    private ProductSellingStatus sellingStatus;

    private String name;


    private int price;

}

// ProductType(ENUM)
@Getter
@RequiredArgsConstructor
public enum ProductType {   // 제품 타입

    HANDMADE("제조 음료"),
    BOTTLE("병 음료"),
    BAKERY("베이커리");

    private final String text;

}

// ProductSellingStatus(ENUM)
@Getter
@RequiredArgsConstructor
public enum ProductSellingStatus {    // 판매 상태

    SELLING("판매 중"),
    HOLD("판매 보류"),
    STOP_SELLING("판매 중지");

    private final String text;

    public static List<ProductSellingStatus> forDisplay() {
        return List.of(SELLING, HOLD);
    }
}
Repository 계층 클래스
@Repository
public interface ProductRepository extends JpaRepository<Product, Long> {

      /**
     * select *
     * from product
     * where selling_type in ('SELLING', 'HOLD')
     */
    List<Product> findAllBySellingStatusIn(List<ProductSellingStatus> sellingTypes);
}
Service 계층 클래스
// ProductService
@RequiredArgsConstructor
@Service
public class ProductService {

    private final ProductRepository productRepository;


    public List<ProductResponse> getSellingProducts() {
        List<Product> products = productRepository.findAllBySellingStatusIn(ProductSellingStatus.forDisplay());

        return products.stream()
                .map(ProductResponse::of)
                .collect(Collectors.toList());
    }
}

// ProductResponse
@Getter
public class ProductResponse {

    private Long id;
    private String productNumber;
    private ProductType type;
    private ProductSellingStatus sellingStatus;
    private String name;
    private int price;

    @Builder
    private ProductResponse(Long id, String productNumber, ProductType type, ProductSellingStatus sellingStatus, String name, int price) {
        this.id = id;
        this.productNumber = productNumber;
        this.type = type;
        this.sellingStatus = sellingStatus;
        this.name = name;
        this.price = price;
    }

    public static ProductResponse of(Product product) {
        return ProductResponse.builder()
                .id(product.getId())
                .productNumber(product.getProductNumber())
                .type(product.getType())
                .sellingStatus(product.getSellingStatus())
                .name(product.getName())
                .price(product.getPrice())
                .build();
    }

}
Controller
@RestController
@RequiredArgsConstructor
public class ProductController {

    private final ProductService productService;

    @GetMapping("/api/v1/products/selling")
    public List<ProductResponse> getSellingProducts() {
        return productService.getSellingProducts();
    }
}
yml 설정
spring:
  profiles:
    default: local

  datasource:
    url: jdbc:h2:mem:~/cafeKioskApplication
    driver-class-name: org.h2.Driver
    username: sa
    password:

  jpa:
    hibernate:
      ddl-auto: none
---
spring:
  config:
    activate:
      on-profile: local

  jpa:
    hibernate:
      ddl-auto: create
    show-sql: true
    properties:
      hibernate:
        format_sql: true
    defer-datasource-initialization: true # (2.5~) Hibernate 초기화 이후 data.sql 실행

  h2:
    console:
      enabled: true
---
spring:
  config:
    activate:
      on-profile: test

  jpa:
    hibernate:
      ddl-auto: create
    show-sql: true
    properties:
      hibernate:
        format_sql: true

  sql:
    init:
      mode: never
하나의 yml에 profile을 분리해놓았다.
H2 초기화 이후 실행될 SQL
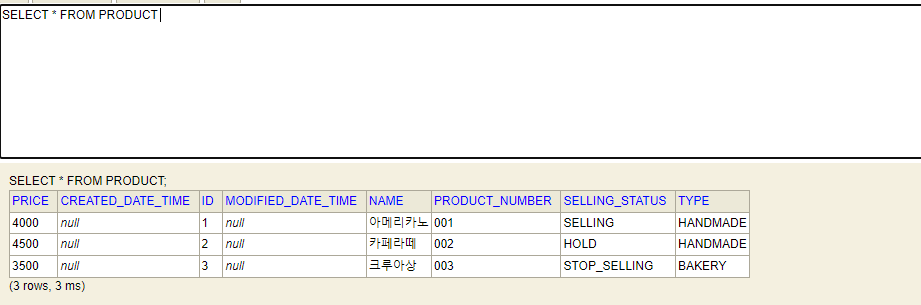
insert into product(product_number, type, selling_status, name, price)
values ('001', 'HANDMADE', 'SELLING', '아메리카노', 4000),
       ('002', 'HANDMADE', 'HOLD', '카페라떼', 4500),
       ('003', 'BAKERY', 'STOP_SELLING', '크루아상', 3500);
서버를 실행 시켜서 확인하면 다음과 같이 잘 나온다.
지금까지는 테스트 없이 한 사이클을 돌아보았다.
이제 Repository Layer에 대한 테스트를 하려고 한다.
테스트 코드
사실 Persistence Layer 테스트는 통합 테스트보단 단위 테스트에 가까운 테스트다.
왜냐하면, 데이터베이스를 접근하는 로직만 있기 때문에 단위 테스트에 가깝다.
@ActiveProfiles("test")
@DataJpaTest
class ProductRepositoryTest {

    @Autowired
    private ProductRepository productRepository;


    @Test
    @DisplayName("원하는 판매상태를 가진 상품들을 조회한다.")
    void findAllBySellingStatusIn() {
        // given
        Product product1 = Product.builder()
                .productNumber("001")
                .type(HANDMADE)
                .sellingStatus(SELLING)
                .name("아메리카노")
                .price(4000)
                .build();

        Product product2 = Product.builder()
                .productNumber("002")
                .type(HANDMADE)
                .sellingStatus(HOLD)
                .name("카페라떼")
                .price(4500)
                .build();

        Product product3 = Product.builder()
                .productNumber("003")
                .type(HANDMADE)
                .sellingStatus(STOP_SELLING)
                .name("팥빙수")
                .price(7000)
                .build();

        productRepository.saveAll(List.of(product1, product2, product3));

        // when
        List<Product> products = productRepository.findAllBySellingStatusIn(List.of(SELLING, HOLD));

        // then
        assertThat(products).hasSize(2)
                .extracting("productNumber", "name", "sellingStatus")
//                .containsExactlyInAnyOrder(                                          // 여러 contains 중, 순서와 상관없이 검증을 해준다. // 순서와 상관있는 것은 containsExactly 이다.
                .containsExactly(                                                      // 여러 contains 중, 순서와 상관없이 검증을 해준다. // 순서와 상관있는 것은 containsExactly 이다.
                        tuple("002", "카페라떼", HOLD),
                        tuple("001", "아메리카노", SELLING)
                );
    }


}
※ 참고로 Assertions는 Assorg.assertj.core.api.Assertions 의 Assertions를 사용하여 static import로 넣어주었다.
※ 잠깐 애너테이션 정리
@SpringBootTest
- 스프링에서 통합 테스트를 위해 제공하는 애너테이션
@DataJpaTest
- JPA와 관련된 빈들만 주입을 해줘서 서버를 띄워준다.
- @SpringBootTest보단 가볍다.
- 우빈님의 결론은
@SpringBootTest를 사용한다고 하신다.
@ActiveProfiles("프로필")
- 프로필을 설정하면 yml에서 설정한 프로필 이름과 같은 설정이 적용된다.
test 메서드
extracting
- 검증하고자 하는 필드를 추출한다.
containsExactlyInAnyOrder
- contains으로 시작하는 검증 메서드 중, 순서와 상관없이 검증을 해준다.
- 순서와 상관있는 것은 containsExactly 이다.
- 단 여기서 말하고 있는 순서란 컬럼 순서가 아니라 데이터 순서다. 아래의 글을 보자.
// then
assertThat(products).hasSize(2)
.extracting("productNumber", "name","sellingStatus")
.containsExactly(
tuple("002", "카페라떼", HOLD),
tuple("001", "아메리카노", SELLING)
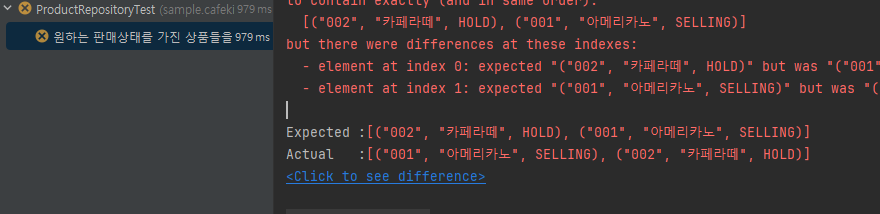
);데이터는 아메리카노, 카페라떼 순으로 넣었는데, containsExactly를 사용하니 테스트가 실패했다.
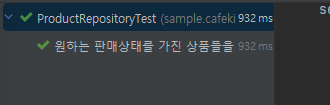
그런데, 순서와 상관없는 containsExactlyInAnyOrder를 사용하니 테스트가 성공했다.
containsExactly
containsExactlyInAnyOrder
3. 요약
컨트롤러 계층(Presentation Layer)로부터 레포지토리 계층(Persistence Layer)까지 기능들을 만들어보고, 테스트를 해보았다.
지극히 개인적인 생각
저번에 JPA를 모르는 상태에서 이 강의를 들었을 때, 생각 없는 클론 코딩이었는데,
JPA를 그나마 조금 안 상태에서 강의를 보니깐 얻어갈 부분들이 많다..
다음 강의가 기대 된다.