
- 분류 전체보기 (241)

| 일 | 월 | 화 | 수 | 목 | 금 | 토 |
|---|---|---|---|---|---|---|
| 1 | 2 | 3 | ||||
| 4 | 5 | 6 | 7 | 8 | 9 | 10 |
| 11 | 12 | 13 | 14 | 15 | 16 | 17 |
| 18 | 19 | 20 | 21 | 22 | 23 | 24 |
| 25 | 26 | 27 | 28 | 29 | 30 | 31 |
- 스레드 제어와 생명 주기
- 시작하세요! 도커 & 쿠버네티스
- 쿠버네티스
- 자바
- 멀티 쓰레드
- java
- 자료구조
- contatiner
- 제네릭스
- Thread
- 인프런
- 시작하세요 도커 & 쿠버네티스
- 동시성
- Kubernetes
- container
- 컨테이너
- 도커 엔진
- 실전 자바 중급 2편
- 오케스트레이션
- 실전 자바 고급 1편
- 쓰레드
- 알고리즘
- 김영한
- Collection
- 스레드
- Docker
- 도커
- 리스트
- 중급자바
- LIST
- Today
- Total
쌩로그
스프링 DB2편 - Ch04. 데이터 접근 기술 - MyBatis 본문
목록
- 포스팅 개요
- 본론
2-1. MyBatis 소개
2-2. MyBatis 설정
2-3. MyBatis 적용1 - 기본
2-4. MyBatis 적용2 - 설정과 실행
2-5. MyBatis 적용3 - 분석
2-6. MyBatis 기능 정리1 - 동적쿼리
2-7. MyBatis 기능 정리2 - 기타 기능 - 요약
1. 포스팅 개요
인프런에서 영한님의 스프링 DB 1편 Section 04. 데이터 접근 기술 - MyBatis를 학습하며 정리한 포스팅이다.
2. 본론
2-1. MyBatis 소개
MyBatis는 앞서 설명한 JdbcTemplate보다 더 많은 기능을 제공하는 SQL Mapper 이다.
기본적으로 JdbcTemplate이 제공하는 대부분의 기능을 제공한다.
JdbcTemplate과 비교해서 MyBatis의 가장 매력적인 점은 SQL을 XML에 편리하게 작성할 수 있고 또 동적 쿼리를 매우 편리하게 작성할 수 있다는 점이다.
먼저 SQL이 여러줄에 걸쳐 있을 때 둘을 비교해보자.
JdbcTemplate - SQL 여러줄
String sql = "update item " + // 주의해야 하는 부분.
    "set item_name=:itemName, price=:price, quantity=:quantity " +
    "where id=:id";
MyBatis - SQL 여러줄
<update id="update">
    update item
    set item_name=#{itemName},
        price=#{price},
        quantity=#{quantity}
    where id = #{id}
</update>
MyBatis는 XML에 작성하기 때문에 라인이 길어져도 문자 더하기에 대한 불편함이 없다.
다음으로 상품을 검색하는 로직을 통해 동적 쿼리를 비교해보자.
JdbcTemplate - 동적 쿼리
String sql = "select id, item_name, price, quantity from item";
//동적 쿼리
if (StringUtils.hasText(itemName) || maxPrice != null) {
    sql += " where";
}

boolean andFlag = false;
if (StringUtils.hasText(itemName)) {
    sql += " item_name like concat('%',:itemName,'%')";
    andFlag = true;
}

if (maxPrice != null) {
    if (andFlag) {
        sql += " and";
    }
    sql += " price <= :maxPrice";
}

log.info("sql={}", sql); return
template.query(sql, param, itemRowMapper());
MyBatis - 동적 쿼리
<select id="findAll" resultType="Item">
select id, item_name, price, quantity
from item
<where>
<if test="itemName != null and itemName != ''">
and item_name like concat('%',#{itemName},'%')
</if>
<if test="maxPrice != null">
and price <= #{maxPrice}
</if>
</where>
</select>JdbcTemplate은 자바 코드로 직접 동적 쿼리를 작성해야 한다.
반면에 MyBatis는 동적 쿼리를 매우 편리하게 작성 할 수 있는 다양한 기능들을 제공해준다.
설정의 장단점
JdbcTemplate은 스프링에 내장된 기능이고, 별도의 설정없이 사용할 수 있다는 장점이 있다.
반면에 MyBatis는 약간의 설정이 필요하다.
※ 최근에는 스프링 부트와 마이바티스를 연동하는 모듈이 나왔기 때문에 편리하게 사용할 수 있다.
정리
프로젝트에서 동적 쿼리와 복잡한 쿼리가 많다면 MyBatis를 사용하고, 단순한 쿼리들이 많으면 JdbcTemplate을 선택해서 사용하면 된다.
물론 둘을 함께 사용해도 된다.
하지만 MyBatis를 선택했다면 그것으로 충분할 것이다.
참고
강의에서는 MyBatis의 기능을 하나하나를 자세하게 다루지는 않는다.
MyBatis를 왜 사용하는지, 그리고 주로 사용하는 기능 위주로 다룬다.
그래도 이 강의를 듣고 나면 MyBatis로 개발을 할 수 있게 되고 추가로 필요한 내용을 공식 사이트에서 찾아서 사용할 수 있게 될 것이다.
MyBatis는 기능도 단순하고 또 공식 사이트가 한글로 잘 번역되어 있어서 원하는 기능을 편리하게 찾아볼 수 있다.
2-2. MyBatis 설정
mybatis-spring-boot-starter 라이브러리를 사용하면 MyBatis를 스프링과 통합하고, 설정도 아주 간단히 할 수 있다.mybatis-spring-boot-starter 라이브러리를 사용해서 간단히 설정하는 방법을 알아보자.
(마이바티스는 스프링이 공식적으로 관리하지 않는다.)
build.gradle 에 다음 의존 관계를 추가한다.
//MyBatis 추가
implementation 'org.mybatis.spring.boot:mybatis-spring-boot-starter:2.2.0' - 참고로 뒤에 버전 정보가 붙는 이유는 스프링 부트가 버전을 관리해주는 공식 라이브러리가 아니기 때문이다. 스프링 부트가 버전을 관리해주는 경우 버전 정보를 붙이지 않아도 최적의 버전을 자동으로 찾아준다.
참고 - 스프링 부트 3.0 이상
스프링 부트 3.0 이상을 사용한다면 mybatis-spring-boot-starter 버전을 2.2.0 대신에 3.0.3을 사용해야 한다.
//MyBatis 스프링 부트 3.0 추가
implementation 'org.mybatis.spring.boot:mybatis-spring-boot-starter:3.0.3'
build.gradle - 의존관계 전체
plugins {
    id 'org.springframework.boot' version '2.6.5'
    id 'io.spring.dependency-management' version '1.0.11.RELEASE'
    id 'java'
}

group = 'com.example'
version = '0.0.1-SNAPSHOT'
sourceCompatibility = '11'

configurations {
    compileOnly {
       extendsFrom annotationProcessor
    }
}

repositories {
    mavenCentral()
}

dependencies {
    implementation 'org.springframework.boot:spring-boot-starter-thymeleaf'
    implementation 'org.springframework.boot:spring-boot-starter-web'

    //JdbcTemplate 추가
    implementation 'org.springframework.boot:spring-boot-starter-jdbc'
    //MyBatis 추가  // 부트 설정에 따라 둘 중에 추가
    implementation 'org.mybatis.spring.boot:mybatis-spring-boot-starter:3.0.3'
    implementation 'org.mybatis.spring.boot:mybatis-spring-boot-starter:2.2.0' #
    //H2 데이터베이스 추가
    runtimeOnly 'com.h2database:h2'
    compileOnly 'org.projectlombok:lombok'
    annotationProcessor 'org.projectlombok:lombok'
    testImplementation 'org.springframework.boot:spring-boot-starter-test'

    //테스트에서 lombok 사용
    testCompileOnly 'org.projectlombok:lombok'
    testAnnotationProcessor 'org.projectlombok:lombok'
}

tasks.named('test') {
    useJUnitPlatform()
}
다음과 같은 라이브러리가 추가된다.
mybatis-spring-boot-starter: MyBatis를 스프링 부트에서 편리하게 사용할 수 있게 시작하는 라이브러리mybatis-spring-boot-autoconfigure: MyBatis와 스프링 부트 설정 라이브러리mybatis-spring: MyBatis와 스프링을 연동하는 라이브러리mybatis: MyBatis 라이브러리
라이브러리 추가는 완료되었다.

mybatis 라이브러리다.
다음으로 설정을 해보자.
설정
application.properties 에 다음 설정을 추가하자. #MyBatis 를 참고하면 된다.
주의!
웹 애플리케이션을 실행하는 main , 테스트를 실행하는 test 각 위치의 application.properties 를 모두 수정해주어야 한다.
설정을 변경해도 반영이 안된다면 이 부분을 꼭! 확인하자.
spring.profiles.active=local
spring.datasource.url=jdbc:h2:tcp://localhost/~/jdbctest
spring.datasource.username=sa

#jdbcTemplate sql log
logging.level.org.springframework.jdbc=debug

#MyBatis
mybatis.type-aliases-package=hello.itemservice.domin
mybatis.configuration.map-underscore-to-camel-case=true
logging.level.hello.itemservice.repository.mybatis=tracemybatis.type-aliases-package- 마이바티스에서 타입 정보를 사용할 때는 패키지 이름을 적어주어야 하는데, 여기에 명시하면 패키지 이름을 생략할 수 있다.
- 지정한 패키지와 그 하위 패키지가 자동으로 인식된다.
- 여러 위치를 지정하려면
, , ;로 구분하면 된다.
mybatis.configuration.map-underscore-to-camel-case- JdbcTemplate의
BeanPropertyRowMapper에서 처럼 언더바를 카멜로 자동 변경해주는 기능을 활성화 한다. 바로 다음에 설명하는 관례의 불일치 내용을 참고하자.
- JdbcTemplate의
logging.level.hello.itemservice.repository.mybatis=trace- MyBatis에서 실행되는 쿼리 로그를 확인할 수 있다.
관례의 불일치
자바 객체에는 주로 카멜( camelCase ) 표기법을 사용한다. itemName 처럼 중간에 낙타 봉이 올라와 있는 표기법이다.
반면에 관계형 데이터베이스에서는 주로 언더스코어를 사용하는 snake_case 표기법을 사용한다.item_name 처럼 중간에 언더스코어를 사용하는 표기법이다.
이렇게 관례로 많이 사용하다 보니 map-underscore-to-camel-case 기능을 활성화 하면 언더스코어 표기법을 카멜로 자동 변환해준다.
따라서 DB에서 select item_name 으로 조회해도 객체의 itemName ( setItemName() ) 속성에 값이 정상 입력된다.
정리하면 해당 옵션을 켜면 snake_case 는 자동으로 해결되니 그냥 두면 되고, 컬럼 이름과 객체 이름이 완전히 다른 경우에는 조회 SQL에서 별칭(as)을 사용하면 된다.
예)
- DB
select item_name - 객체
name
별칭을 통한 해결방안select item_name as name
2-3. MyBatis 적용1 - 기본
이제부터 본격적으로 MyBatis를 사용해서 데이터베이스에 데이터를 저장해보자.
XML에 작성한다는 점을 제외하고는 JDBC 반복을 줄여준다는 점에서 기존 JdbcTemplate과 거의 유사하다.
ItemMapper
package hello.itemservice.repository.mybatis;

import hello.itemservice.domain.Item;
import hello.itemservice.repository.ItemSearchCond;
import hello.itemservice.repository.ItemUpdateDto;
import org.apache.ibatis.annotations.Mapper;
import org.apache.ibatis.annotations.Param;

import java.util.List;
import java.util.Optional;

@Mapper
public interface ItemMapper {

    void save(Item item);

    void update(@Param("id") Long id, @Param("updateParam") ItemUpdateDto updateParam);

    List<Item> findAll(ItemSearchCond itemSearchCond);

    Optional<Item> findById(Long id);

}- 마이바티스 매핑 XML을 호출해주는 매퍼 인터페이스이다.
- 이 인터페이스에는
@Mapper애노테이션을 붙여주어야 한다. 그래야 MyBatis에서 인식할 수 있다. - 이 인터페이스의 메서드를 호출하면 다음에 보이는
xml의 해당 SQL을 실행하고 결과를 돌려준다. ItemMapper인터페이스의 구현체에 대한 부분은 뒤에 별도로 설명한다.
이제 같은 위치에 실행할 SQL이 있는 XML 매핑 파일을 만들어주면 된다.
참고로 자바 코드가 아니기 때문에 src/main/resources 하위에 만들되, 패키지 위치는 맞추어 주어야 한다.
src/main/resources/hello/itemservice/repository/mybatis/ItemMapper.xml 에 다음과 같이 설정하자.
<?xml version="1.0" encoding="UTF-8"?>
<!DOCTYPE mapper PUBLIC "-//mybatis.org//DTD Mapper 3.0//EN"
"http://mybatis.org/dtd/mybatis-3-mapper.dtd">
<mapper namespace="hello.itemservice.repository.mybatis.ItemMapper">
<insert id="save" useGeneratedKeys="true" keyProperty="id">
    insert into item (item_name, price, quantity)
    values (#{itemName}, #{price}, #{quantity})
</insert>
<update id="update">
update item
set item_name=#{updateParam.itemName}, price=#{updateParam.price}, quantity=#{updateParam.quantity} where id=#{id} </update>
<select id="findById" resultType="Item">
select id, item_name, price, quantity
from item where id = #{id} </select>
<select id="findAll" resultType="Item">
select id, item_name, price, quantity
from item <where>
<if test="itemName != null ane itemName != ''">
and item_name like concat('%', #{itemName}, '%')
</if>
<if test="maxPrice != null">
and price <= #{maxPrice}
</if>
</where>
</select>
</mapper>namespace: 앞서 만든 매퍼 인터페이스를 지정하면 된다.- 주의! 경로와 파일 이름에 주의하자.
참고
참고로 이때까지 블로깅에 코드를 적을 때 패키지명에 hello는 계속 빼고 있었는데, 위치에 따라 MyBatis의 mapper가 인식하므로 경로를 그냥 다 적도록하겠다.
참고 - XML 파일 경로 수정하기
XML 파일을 원하는 위치에 두고 싶으면 application.properties 에 다음과 같이 설정하면 된다.mybatis.mapper-locations=classpath:mapper/**/*.xml
이렇게 하면 resources/mapper 를 포함한 그 하위 폴더에 있는 XML을 XML 매핑 파일로 인식한다.
이 경우 파일 이름은 자유롭게 설정해도 된다.
참고로 테스트의 application.properties 파일도 함께 수정해야 테스트를 실행할 때 인식할 수 있다.
insert 쿼리를 사용하는 save() 를 보자.
void save(Item item);<insert id="save" useGeneratedKeys="true" keyProperty="id">
insert into item (item_name, price, quantity)
values (#{itemName}, #{price}, #{quantity})
</insert>- Insert SQL은
<insert>를 사용하면 된다. - id 에는 매퍼 인터페이스에 설정한 메서드 이름을 지정하면 된다. 여기서는 메서드 이름이
save()이므로save로 지정하면 된다. - 파라미터는
#{}문법을 사용하면 된다. 그리고 매퍼에서 넘긴 객체의 프로퍼티 이름을 적어주면 된다. #{}문법을 사용하면PreparedStatement를 사용한다. JDBC의?를 치환한다 생각하면 된다.useGeneratedKeys는 데이터베이스가 키를 생성해 주는IDENTITY전략일 때 사용한다.keyProperty는 생성되는 키의 속성 이름을 지정한다. Insert가 끝나면item객체의id속성에 생성된 값이 입력된다.
update 쿼리를 사용하는 update() 메서드를 보자.
import org.apache.ibatis.annotations.Param;

void update(@Param("id") Long id, @Param("updateParam") ItemUpdateDto updateParam);
<update id="update">
update item
set item_name=#{updateParam.itemName},
price=#{updateParam.price},
quantity=#{updateParam.quantity}
where id = #{id}
</update>- Update SQL은
<update>를 사용하면 된다. - 여기서는 파라미터가
Long id,ItemUpdateDtoupdateParam으로 2개이다. 파라미터가 1개만 있으면@Param을 지정하지 않아도 되지만, 파라미터가 2개 이상이면@Param으로 이름을 지정해서 파라미터를 구분 해야 한다.
select 를 사용하는 findById()메서드를 보자.
Optional findById(Long id);<select id="findById" resultType="Item">
select id, item_name, price, quantity
from item
where id = #{id}
</select>- Select SQL은
<select>를 사용하면 된다. resultType은 반환 타입을 명시하면 된다. 여기서는 결과를Item객체에 매핑한다.- 앞서
application.properties에mybatis.type-aliasespackage=hello.itemservice.domain속성을 지정한 덕분에 모든 패키지 명을 다 적지는 않아도 된다. 그렇지 않으면 모든 패키지 명을 다 적어야 한다. - JdbcTemplate의
BeanPropertyRowMapper처럼 SELECT SQL의 결과를 편리하게 객체로 바로 변환해준다. mybatis.configuration.map-underscore-to-camel-case=true속성을 지정한 덕분에 언더스코어를 카멜 표기법으로 자동으로 처리해준다. (item_name->itemName)
- 앞서
- 자바 코드에서 반환 객체가 하나이면
Item,Optional<Item>과 같이 사용하면 되고, 반환 객체가 하나 이상 이면 컬렉션을 사용하면 된다. 주로 List 를 사용한다. 다음을 참고하자.
select 를 사용하여 전체 조회를 하는 findAll() 메서드다.
List findAll(ItemSearchCond itemSearch);<select id="findAll" resultType="Item">
select id, item_name, price, quantity
from item
<where>
<if test="itemName != null and itemName != ''">
and item_name like concat('%',#{itemName},'%')
</if>
<if test="maxPrice != null">
test="maxPrice != null"> and price <= #{maxPrice}
</if>
</where>
</select>- Mybatis는
<where>,<if>같은 동적 쿼리 문법을 통해 편리한 동적 쿼리를 지원한다. <if>는 해당 조건이 만족하면 구문을 추가한다.<where>은 적절하게where문장을 만들어준다.- 예제에서
<if>가 모두 실패하게 되면 SQLwhere를 만들지 않는다. - 예제에서
<if>가 하나라도 성공하면 처음 나타나는and를where로 변환해준다.
- 예제에서
XML 특수문자
그런데 가격을 비교하는 조건을 보자.and price <= #{maxPrice}
여기에 보면 <= 를 사용하지 않고 <= 를 사용한 것을 확인할 수 있다.
그 이유는 XML에서는 데이터 영역에 < , > 같은 특수 문자를 사용할 수 없기 때문이다.
이유는 간단한데, XML에서 TAG가 시작하거나 종료할 때 < , > 와 같은 특 수문자를 사용하기 때문이다.
< : <
> : >
& : &다른 해결 방안으로는 XML에서 지원하는 CDATA 구문 문법을 사용하는 것이다.
이 구문 안에서는 특수문자를 사용할 수 있다.
대신 이 구문 안에서는 XML TAG가 단순 문자로 인식되기 때문에 <if>, <where> 등이 적용되지 않는다.
XML CDATA 사용
<select id="findAll" resultType="Item">
    select id, item_name, price, quantity
    from item
    <where>
        <if test="itemName != null and itemName != ''">
            and item_name like concat('%',#{itemName},'%')
        </if>
        <if test="maxPrice != null">
            <![CDATA[
            and price <= #{maxPrice}
            ]]>
        </if>
    </where>
</select>
특수문자와 CDATA 각각 상황에 따른 장단점이 있으므로 원하는 방법을 그때그때 선택하면 된다.
2-4. MyBatis 적용2 - 설정과 실행
itemservice.repository.mybatis 패키지에서 MyBatisItemRepository 클래스를 다음과 같이 작성하자.
package hello.itemservice.repository.mybatis;

import hello.itemservice.domain.Item;
import hello.itemservice.repository.ItemRepository;
import hello.itemservice.repository.ItemSearchCond;
import hello.itemservice.repository.ItemUpdateDto;
import lombok.RequiredArgsConstructor;
import org.springframework.stereotype.Repository;

import java.util.List;
import java.util.Optional;

@Repository
@RequiredArgsConstructor
public class MyBatisItemRepository implements ItemRepository {

    private final ItemMapper itemMapper;


    @Override
    public Item save(Item item) {
        itemMapper.save(item);
        return item;
    }

    @Override
    public void update(Long itemId, ItemUpdateDto updateParam) {
        itemMapper.update(itemId, updateParam);
    }

    @Override
    public Optional<Item> findById(Long id) {
        return itemMapper.findById(id);
    }

    @Override
    public List<Item> findAll(ItemSearchCond cond) {
        return itemMapper.findAll(cond);
    }
}ItemRepository를 구현해서MyBatisItemRepository를 만들었다.- MyBatisItemRepository 는 단순히 ItemMapper 에 기능을 위임한다.
itemservice.config 패키지에서 MyBatisConfig 클래스를 다음과 같이 작성하자.
package hello.itemservice.config;

import hello.itemservice.repository.ItemRepository;
import hello.itemservice.repository.mybatis.ItemMapper;
import hello.itemservice.repository.mybatis.MyBatisItemRepository;
import hello.itemservice.service.ItemService;
import hello.itemservice.service.ItemServiceV1;
import lombok.RequiredArgsConstructor;
import org.springframework.context.annotation.Bean;
import org.springframework.context.annotation.Configuration;

@Configuration
@RequiredArgsConstructor
public class MyBatisConfig {

    private final ItemMapper itemMapper;

    @Bean
    public ItemService itemService() {
        return new ItemServiceV1(itemRepository());
    }

    @Bean
    public ItemRepository itemRepository() {
        return new MyBatisItemRepository(itemMapper);
    }
}MyBatisConfig는ItemMapper를 주입받고, 필요한 의존관계를 만든다.
ItemServiceApplication을 다음처럼 변경하자.
@Slf4j
//@Import(MemoryConfig.class)
//@Import(JdbcTemplateV1Config.class)
//@Import(JdbcTemplateV2Config.class)
//@Import(JdbcTemplateV3Config.class)
@Import(MyBatisConfig.class)
@SpringBootApplication(scanBasePackages = "hello.itemservice.web")
public class ItemServiceApplication {

    ...
    ...

}@Import(MyBatisConfig.class): 앞서 설정한 MyBatisConfig.class 를 사용하도록 설정했다.
테스트를 실행하자
먼저 ItemRepositoryTest 를 통해서 리포지토리가 정상 동작하는지 확인해보자.
테스트가 모두 성공해야 한다.
애플리케이션을 실행하자
ItemServiceApplication 를 실행해서 애플리케이션이 정상 동작하는지 확인해보자.
주의!
H2 데이터베이스 서버는 당연히 먼저 실행되있어야 한다.
참고로 부트 설정 잘 맞춰야 한다.
그리고 오타도 잘 확인하자....
ㅋㅋㅋㅋㅋ
영한님과 내가 같은 오류가 났는데, 오타가 서로 다른 곳에서 났다..
ㅋㅋㅋㅋㅋㅋ
실행 결과는 다음과 같다.
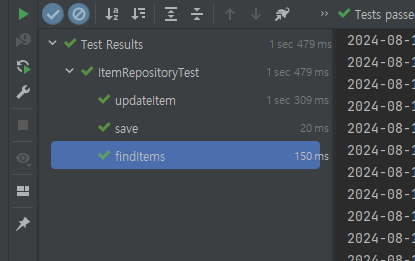
로그는 다음과 같다.
2024-08-13 22:40:29.430 DEBUG 14932 --- [    Test worker] o.s.jdbc.support.JdbcTransactionManager  : Creating new transaction with name [hello.itemservice.domain.ItemRepositoryTest.findItems]: PROPAGATION_REQUIRED,ISOLATION_DEFAULT
2024-08-13 22:40:29.430 DEBUG 14932 --- [    Test worker] o.s.jdbc.support.JdbcTransactionManager  : Acquired Connection [HikariProxyConnection@600252712 wrapping conn0: url=jdbc:h2:mem:c73fd8a8-ef52-4a23-b01e-a0a03201a27f user=SA] for JDBC transaction
2024-08-13 22:40:29.430 DEBUG 14932 --- [    Test worker] o.s.jdbc.support.JdbcTransactionManager  : Switching JDBC Connection [HikariProxyConnection@600252712 wrapping conn0: url=jdbc:h2:mem:c73fd8a8-ef52-4a23-b01e-a0a03201a27f user=SA] to manual commit
2024-08-13 22:40:29.430  INFO 14932 --- [    Test worker] o.s.t.c.transaction.TransactionContext   : Began transaction (1) for test context [DefaultTestContext@3228d990 testClass = ItemRepositoryTest, testInstance = hello.itemservice.domain.ItemRepositoryTest@2bd2430f, testMethod = findItems@ItemRepositoryTest, testException = [null], mergedContextConfiguration = [WebMergedContextConfiguration@54e7391d testClass = ItemRepositoryTest, locations = '{}', classes = '{class hello.itemservice.ItemServiceApplication}', contextInitializerClasses = '[]', activeProfiles = '{}', propertySourceLocations = '{}', propertySourceProperties = '{org.springframework.boot.test.context.SpringBootTestContextBootstrapper=true}', contextCustomizers = set[org.springframework.boot.test.autoconfigure.actuate.metrics.MetricsExportContextCustomizerFactory$DisableMetricExportContextCustomizer@aa549e5, org.springframework.boot.test.autoconfigure.properties.PropertyMappingContextCustomizer@0, org.springframework.boot.test.autoconfigure.web.servlet.WebDriverContextCustomizerFactory$Customizer@57fd91c9, org.springframework.boot.test.context.filter.ExcludeFilterContextCustomizer@565b064f, org.springframework.boot.test.json.DuplicateJsonObjectContextCustomizerFactory$DuplicateJsonObjectContextCustomizer@58c34bb3, org.springframework.boot.test.mock.mockito.MockitoContextCustomizer@0, org.springframework.boot.test.web.client.TestRestTemplateContextCustomizer@75459c75, org.springframework.boot.test.context.SpringBootTestArgs@1, org.springframework.boot.test.context.SpringBootTestWebEnvironment@b86de0d], resourceBasePath = 'src/main/webapp', contextLoader = 'org.springframework.boot.test.context.SpringBootContextLoader', parent = [null]], attributes = map['org.springframework.test.context.web.ServletTestExecutionListener.activateListener' -> true, 'org.springframework.test.context.web.ServletTestExecutionListener.populatedRequestContextHolder' -> true, 'org.springframework.test.context.web.ServletTestExecutionListener.resetRequestContextHolder' -> true, 'org.springframework.test.context.event.ApplicationEventsTestExecutionListener.recordApplicationEvents' -> false]]; transaction manager [org.springframework.jdbc.support.JdbcTransactionManager@156cfa20]; rollback [true]
2024-08-13 22:40:29.434 DEBUG 14932 --- [    Test worker] h.i.repository.mybatis.ItemMapper.save   : ==>  Preparing: insert into item (item_name, price, quantity) values (?, ?, ?)
2024-08-13 22:40:29.434 DEBUG 14932 --- [    Test worker] h.i.repository.mybatis.ItemMapper.save   : ==> Parameters: itemA-1(String), 10000(Integer), 10(Integer)
2024-08-13 22:40:29.435 DEBUG 14932 --- [    Test worker] h.i.repository.mybatis.ItemMapper.save   : <==    Updates: 1
2024-08-13 22:40:29.436 DEBUG 14932 --- [    Test worker] h.i.repository.mybatis.ItemMapper.save   : ==>  Preparing: insert into item (item_name, price, quantity) values (?, ?, ?)
2024-08-13 22:40:29.437 DEBUG 14932 --- [    Test worker] h.i.repository.mybatis.ItemMapper.save   : ==> Parameters: itemA-2(String), 20000(Integer), 20(Integer)
2024-08-13 22:40:29.437 DEBUG 14932 --- [    Test worker] h.i.repository.mybatis.ItemMapper.save   : <==    Updates: 1
2024-08-13 22:40:29.438 DEBUG 14932 --- [    Test worker] h.i.repository.mybatis.ItemMapper.save   : ==>  Preparing: insert into item (item_name, price, quantity) values (?, ?, ?)
2024-08-13 22:40:29.439 DEBUG 14932 --- [    Test worker] h.i.repository.mybatis.ItemMapper.save   : ==> Parameters: itemB-1(String), 30000(Integer), 30(Integer)
2024-08-13 22:40:29.439 DEBUG 14932 --- [    Test worker] h.i.repository.mybatis.ItemMapper.save   : <==    Updates: 1
2024-08-13 22:40:29.499 DEBUG 14932 --- [    Test worker] h.i.r.mybatis.ItemMapper.findAll         : ==>  Preparing: select id, item_name, price, quantity from item
2024-08-13 22:40:29.499 DEBUG 14932 --- [    Test worker] h.i.r.mybatis.ItemMapper.findAll         : ==> Parameters:
2024-08-13 22:40:29.500 TRACE 14932 --- [    Test worker] h.i.r.mybatis.ItemMapper.findAll         : <==    Columns: ID, ITEM_NAME, PRICE, QUANTITY
2024-08-13 22:40:29.500 TRACE 14932 --- [    Test worker] h.i.r.mybatis.ItemMapper.findAll         : <==        Row: 3, itemA-1, 10000, 10
2024-08-13 22:40:29.500 TRACE 14932 --- [    Test worker] h.i.r.mybatis.ItemMapper.findAll         : <==        Row: 4, itemA-2, 20000, 20
2024-08-13 22:40:29.501 TRACE 14932 --- [    Test worker] h.i.r.mybatis.ItemMapper.findAll         : <==        Row: 5, itemB-1, 30000, 30
2024-08-13 22:40:29.501 DEBUG 14932 --- [    Test worker] h.i.r.mybatis.ItemMapper.findAll         : <==      Total: 3
2024-08-13 22:40:29.540 DEBUG 14932 --- [    Test worker] h.i.r.mybatis.ItemMapper.findAll         : ==>  Preparing: select id, item_name, price, quantity from item WHERE item_name like concat('%', ?, '%')
2024-08-13 22:40:29.543 DEBUG 14932 --- [    Test worker] h.i.r.mybatis.ItemMapper.findAll         : ==> Parameters: itemA(String)
2024-08-13 22:40:29.546 TRACE 14932 --- [    Test worker] h.i.r.mybatis.ItemMapper.findAll         : <==    Columns: ID, ITEM_NAME, PRICE, QUANTITY
2024-08-13 22:40:29.546 TRACE 14932 --- [    Test worker] h.i.r.mybatis.ItemMapper.findAll         : <==        Row: 3, itemA-1, 10000, 10
2024-08-13 22:40:29.547 TRACE 14932 --- [    Test worker] h.i.r.mybatis.ItemMapper.findAll         : <==        Row: 4, itemA-2, 20000, 20
2024-08-13 22:40:29.547 DEBUG 14932 --- [    Test worker] h.i.r.mybatis.ItemMapper.findAll         : <==      Total: 2
2024-08-13 22:40:29.548 DEBUG 14932 --- [    Test worker] h.i.r.mybatis.ItemMapper.findAll         : ==>  Preparing: select id, item_name, price, quantity from item WHERE item_name like concat('%', ?, '%')
2024-08-13 22:40:29.549 DEBUG 14932 --- [    Test worker] h.i.r.mybatis.ItemMapper.findAll         : ==> Parameters: temA(String)
2024-08-13 22:40:29.549 TRACE 14932 --- [    Test worker] h.i.r.mybatis.ItemMapper.findAll         : <==    Columns: ID, ITEM_NAME, PRICE, QUANTITY
2024-08-13 22:40:29.551 TRACE 14932 --- [    Test worker] h.i.r.mybatis.ItemMapper.findAll         : <==        Row: 3, itemA-1, 10000, 10
2024-08-13 22:40:29.555 TRACE 14932 --- [    Test worker] h.i.r.mybatis.ItemMapper.findAll         : <==        Row: 4, itemA-2, 20000, 20
2024-08-13 22:40:29.556 DEBUG 14932 --- [    Test worker] h.i.r.mybatis.ItemMapper.findAll         : <==      Total: 2
2024-08-13 22:40:29.558 DEBUG 14932 --- [    Test worker] h.i.r.mybatis.ItemMapper.findAll         : ==>  Preparing: select id, item_name, price, quantity from item WHERE item_name like concat('%', ?, '%')
2024-08-13 22:40:29.559 DEBUG 14932 --- [    Test worker] h.i.r.mybatis.ItemMapper.findAll         : ==> Parameters: itemB(String)
2024-08-13 22:40:29.559 TRACE 14932 --- [    Test worker] h.i.r.mybatis.ItemMapper.findAll         : <==    Columns: ID, ITEM_NAME, PRICE, QUANTITY
2024-08-13 22:40:29.559 TRACE 14932 --- [    Test worker] h.i.r.mybatis.ItemMapper.findAll         : <==        Row: 5, itemB-1, 30000, 30
2024-08-13 22:40:29.562 DEBUG 14932 --- [    Test worker] h.i.r.mybatis.ItemMapper.findAll         : <==      Total: 1
2024-08-13 22:40:29.563 DEBUG 14932 --- [    Test worker] h.i.r.mybatis.ItemMapper.findAll         : ==>  Preparing: select id, item_name, price, quantity from item WHERE price <= ?
2024-08-13 22:40:29.563 DEBUG 14932 --- [    Test worker] h.i.r.mybatis.ItemMapper.findAll         : ==> Parameters: 10000(Integer)
2024-08-13 22:40:29.564 TRACE 14932 --- [    Test worker] h.i.r.mybatis.ItemMapper.findAll         : <==    Columns: ID, ITEM_NAME, PRICE, QUANTITY
2024-08-13 22:40:29.564 TRACE 14932 --- [    Test worker] h.i.r.mybatis.ItemMapper.findAll         : <==        Row: 3, itemA-1, 10000, 10
2024-08-13 22:40:29.565 DEBUG 14932 --- [    Test worker] h.i.r.mybatis.ItemMapper.findAll         : <==      Total: 1
2024-08-13 22:40:29.567 DEBUG 14932 --- [    Test worker] h.i.r.mybatis.ItemMapper.findAll         : ==>  Preparing: select id, item_name, price, quantity from item WHERE item_name like concat('%', ?, '%') and price <= ?
2024-08-13 22:40:29.568 DEBUG 14932 --- [    Test worker] h.i.r.mybatis.ItemMapper.findAll         : ==> Parameters: itemA(String), 10000(Integer)
2024-08-13 22:40:29.569 TRACE 14932 --- [    Test worker] h.i.r.mybatis.ItemMapper.findAll         : <==    Columns: ID, ITEM_NAME, PRICE, QUANTITY
2024-08-13 22:40:29.570 TRACE 14932 --- [    Test worker] h.i.r.mybatis.ItemMapper.findAll         : <==        Row: 3, itemA-1, 10000, 10
2024-08-13 22:40:29.570 DEBUG 14932 --- [    Test worker] h.i.r.mybatis.ItemMapper.findAll         : <==      Total: 1
2024-08-13 22:40:29.576 DEBUG 14932 --- [    Test worker] o.s.jdbc.support.JdbcTransactionManager  : Initiating transaction rollback
2024-08-13 22:40:29.576 DEBUG 14932 --- [    Test worker] o.s.jdbc.support.JdbcTransactionManager  : Rolling back JDBC transaction on Connection [HikariProxyConnection@600252712 wrapping conn0: url=jdbc:h2:mem:c73fd8a8-ef52-4a23-b01e-a0a03201a27f user=SA]
2024-08-13 22:40:29.578 DEBUG 14932 --- [    Test worker] o.s.jdbc.support.JdbcTransactionManager  : Releasing JDBC Connection [HikariProxyConnection@600252712 wrapping conn0: url=jdbc:h2:mem:c73fd8a8-ef52-4a23-b01e-a0a03201a27f user=SA] after transaction
2024-08-13 22:40:29.578  INFO 14932 --- [    Test worker] o.s.t.c.transaction.TransactionContext   : Rolled back transaction for test: [DefaultTestContext@3228d990 testClass = ItemRepositoryTest, testInstance = hello.itemservice.domain.ItemRepositoryTest@2bd2430f, testMethod = findItems@ItemRepositoryTest, testException = [null], mergedContextConfiguration = [WebMergedContextConfiguration@54e7391d testClass = ItemRepositoryTest, locations = '{}', classes = '{class hello.itemservice.ItemServiceApplication}', contextInitializerClasses = '[]', activeProfiles = '{}', propertySourceLocations = '{}', propertySourceProperties = '{org.springframework.boot.test.context.SpringBootTestContextBootstrapper=true}', contextCustomizers = set[org.springframework.boot.test.autoconfigure.actuate.metrics.MetricsExportContextCustomizerFactory$DisableMetricExportContextCustomizer@aa549e5, org.springframework.boot.test.autoconfigure.properties.PropertyMappingContextCustomizer@0, org.springframework.boot.test.autoconfigure.web.servlet.WebDriverContextCustomizerFactory$Customizer@57fd91c9, org.springframework.boot.test.context.filter.ExcludeFilterContextCustomizer@565b064f, org.springframework.boot.test.json.DuplicateJsonObjectContextCustomizerFactory$DuplicateJsonObjectContextCustomizer@58c34bb3, org.springframework.boot.test.mock.mockito.MockitoContextCustomizer@0, org.springframework.boot.test.web.client.TestRestTemplateContextCustomizer@75459c75, org.springframework.boot.test.context.SpringBootTestArgs@1, org.springframework.boot.test.context.SpringBootTestWebEnvironment@b86de0d], resourceBasePath = 'src/main/webapp', contextLoader = 'org.springframework.boot.test.context.SpringBootContextLoader', parent = [null]], attributes = map['org.springframework.test.context.web.ServletTestExecutionListener.activateListener' -> true, 'org.springframework.test.context.web.ServletTestExecutionListener.populatedRequestContextHolder' -> true, 'org.springframework.test.context.web.ServletTestExecutionListener.resetRequestContextHolder' -> true, 'org.springframework.test.context.event.ApplicationEventsTestExecutionListener.recordApplicationEvents' -> false]]
2-5. MyBatis 적용3 - 분석
생각해보면 지금까지 진행한 내용중에 약간 이상한 부분이 있다.ItemMapper 매퍼 인터페이스의 구현체가 없는데 어떻게 동작한 것일까?
ItemMapper 인터페이스
package hello.itemservice.repository.mybatis;

import hello.itemservice.domain.Item;
import hello.itemservice.repository.ItemSearchCond;
import hello.itemservice.repository.ItemUpdateDto;
import org.apache.ibatis.annotations.Mapper;
import org.apache.ibatis.annotations.Param;

import java.util.List;
import java.util.Optional;

@Mapper
public interface ItemMapper {

    void save(Item item);

    void update(@Param("id") Long id, @Param("updateParam") ItemUpdateDto updateParam);

    Optional<Item> findById(Long id);

    List<Item> findAll(ItemSearchCond itemSearchCond);


}
이 부분은 MyBatis 스프링 연동 모듈에서 자동으로 처리해주는데 다음과 같다.
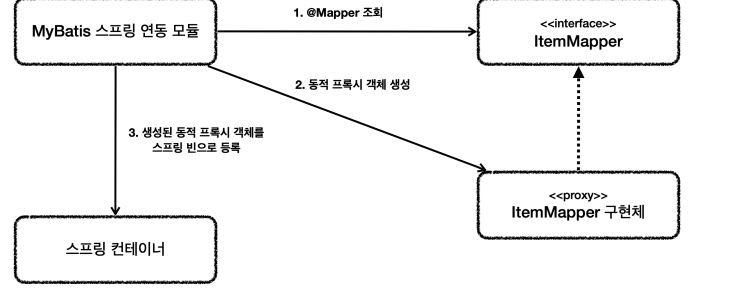
- 애플리케이션 로딩 시점에 MyBatis 스프링 연동 모듈은
@Mapper가 붙어있는 인터페이스를 조사한다.
- 애플리케이션 로딩 시점에 MyBatis 스프링 연동 모듈은
- 해당 인터페이스가 발견되면 동적 프록시 기술을 사용해서
ItemMapper인터페이스의 구현체를 만든다.
- 해당 인터페이스가 발견되면 동적 프록시 기술을 사용해서
- 생성된 구현체를 스프링 빈으로 등록한다.
실제 동적 프록시 기술이 사용되었는지 간단히 확인해보자.
MyBatisItemRepository 에 로그를 추가하자.
@Override
public Item save(Item item) {
    log.info("itemMapper class={}", itemMapper.getClass());  //  로그를 위한 코드 추가가
    itemMapper.save(item);
    return item;
}
실행해서 주입 받은 ItemMapper 의 클래스를 출력해보자.save()를 돌려서 확인해보자.
실행 결과
2024-08-13 22:43:59.897 INFO 21372 --- [ Test worker] h.i.r.mybatis.MyBatisItemRepository : itemMapper class=class com.sun.proxy.$Proxy69출력해보면 JDK 동적 프록시가 적용된 것을 확인할 수 있다.
참고
동적 프록시 기술은 스프링 핵심원리 - 고급편에서 자세히 설명한다.
매퍼 구현체
- 마이바티스 스프링 연동 모듈이 만들어주는
ItemMapper의 구현체 덕분에 인터페이스 만으로 편리하게 XML 의 데이터를 찾아서 호출할 수 있다. - 원래 마이바티스를 사용하려면 더 번잡한 코드를 거쳐야 하는데, 이런 부분을 인터페이스 하나로 매우 깔끔하고 편리하게 사용할 수 있다.
- 매퍼 구현체는 예외 변환까지 처리해준다. MyBatis에서 발생한 예외를 스프링 예외 추상화인
DataAccessException에 맞게 변환해서 반환해준다. JdbcTemplate이 제공하는 예외 변환 기능을 여기서도 제공한다고 이해하면 된다.
정리
- 매퍼 구현체 덕분에 마이바티스를 스프링에 편리하게 통합해서 사용할 수 있다.
- 매퍼 구현체를 사용하면 스프링 예외 추상화도 함께 적용된다.
- 마이바티스 스프링 연동 모듈이 많은 부분을 자동으로 설정해주는데, 데이터베이스 커넥션, 트랜잭션과 관련된 기능도 마이바티스와 함께 연동하고, 동기화해준다.
참고
마이바티스 스프링 연동 모듈이 자동으로 등록해주는 부분은 MybatisAutoConfiguration 클래스를 참고하자.
2-6. MyBatis 기능 정리1 - 동적쿼리
MyBatis에서 자주 사용하는 주요 기능을 공식 메뉴얼이 제공하는 예제를 통해 간단히 정리해보자
- MyBatis 공식 메뉴얼: https://mybatis.org/mybatis-3/ko/index.html
- MyBatis 스프링 공식 메뉴얼: https://mybatis.org/spring/ko/index.html
동적 SQL
마이바티스가 제공하는 최고의 기능이자 마이바티스를 사용하는 이유는 바로 동적 SQL 기능 때문이다.
동적 쿼리를 위해 제공되는 기능은 다음과 같다.
ifchoose (when, otherwise)trim (where, set)foreach
공식 메뉴얼에서 제공하는 예제를 통해 동적 SQL을 알아보자
if
<select id="findActiveBlogWithTitleLike"
 resultType="Blog">
 SELECT * FROM BLOG
 WHERE state = ‘ACTIVE’
 <if test="title != null">
     AND title like #{title}
 </if>
</select>- 해당 조건에 따라 값을 추가할지 말지 판단한다
- . 내부의 문법은 OGNL을 사용한다. 자세한 내용은 OGNL을 검색해보자.
choose, when, otherwise
<select id="findActiveBlogLike"
 resultType="Blog">
    SELECT * FROM BLOG WHERE state = ‘ACTIVE’
        <choose>
            <when test="title != null">
                AND title like #{title}
            </when>
             <when test="author != null and author.name != null">
                 AND author_name like #{author.name}
             </when>
         <otherwise>
             AND featured = 1
        </otherwise>
    </choose>
</select>- 자바의 switch 구문과 유사한 구문도 사용할 수 있다.
trim, where, set
<select id="findActiveBlogLike"
        resultType="Blog">
    SELECT * FROM BLOG
    WHERE    <if test="state != null">
        state = #{state}
    </if>
    <if test="title != null">
        AND title like #{title}
    </if>
    <if test="author != null and author.name != null">
        AND author_name like #{author.name}
    </if>
</select>
이 예제의 문제점은 문장을 모두 만족하지 않을 때 발생한다.
SELECT * FROM BLOG
WHERE
title 만 만족할 때도 문제가 발생한다.
SELECT * FROM BLOG
WHERE
AND title like ‘someTitle’
결국 WHERE 문을 언제 넣어야 할지 상황에 따라서 동적으로 달라지는 문제가 있다.<where>를 사용하면 이런 문제를 해결할 수 있다.
<where> 사용
<select id="findActiveBlogLike"
        resultType="Blog">
    SELECT * FROM BLOG
    <where>
        <if test="state != null">
            state = #{state}
        </if>
        <if test="title != null">
            AND title like #{title}
        </if>
        <if test="author != null and author.name != null">
            AND author_name like #{author.name}
        </if>
    </where>
</select><where>는 문장이 없으면 where 를 추가하지 않는다.
문장이 있으면 where 를 추가한다.
만약 and 가 먼저 시작 된다면 and 를 지운다.
참고로 다음과 같이 trim 이라는 기능으로 사용해도 된다.
이렇게 정의하면 <where> 와 같은 기능을 수행한다.
<trim prefix="WHERE" prefixOverrides="AND |OR ">
    ...
</trim>
foreach
<select id="selectPostIn" resultType="domain.blog.Post">
    SELECT *
    FROM POST P    <where>
        <foreach item="item" index="index" collection="list"
                 open="ID in (" separator="," close=")" nullable="true">
            #{item}
        </foreach>
    </where>
</select>- 컬렉션을 반복 처리할 때 사용한다.
where in (1,2,3,4,5,6)와 같은 문장을 쉽게 완성할 수 있다. - 파라미터로
List를 전달하면 된다.
참고
동적 쿼리에 대한 자세한 내용은 다음을 참고하자.
2-7. MyBatis 기능 정리2 - 기타 기능
애노테이션으로 SQL 작성
다음과 같이 XML 대신에 애노테이션에 SQL을 작성할 수 있다.
@Select("select id, item_name, price, quantity from item where id=#{id}")
Optional findById(Long id);@Insert,@Update,@Delete,@Select기능이 제공된다.- 이 경우 XML에는
<select id="findById"> ~ </select>는 제거해야 한다. - 동적 SQL이 해결되지 않으므로 간단한 경우에만 사용한다.
애노테이션으로 SQL 작성에 대한 더 자세한 내용은 다음을 참고하자.
문자열 대체(String Substitution)
#{} 문법은 ?를 넣고 파라미터를 바인딩하는 PreparedStatement 를 사용한다.
때로는 파라미터 바인딩이 아니라 문자 그대로를 처리하고 싶은 경우도 있다.
이때는 ${} 를 사용하면 된다.
다음 예제를 보자ORDER BY ${columnName}
@Select("select * from user where ${column} = #{value}") User findByColumn(@Param("column") String column, @Param("value") String value);주의
${} 를 사용하면 SQL 인젝션 공격을 당할 수 있다.
따라서 가급적 사용하면 안된다.
사용하더라도 매우 주의깊게 사용 해야 한다.
재사용 가능한 SQL 조각
<sql>을 사용하면 SQL 코드를 재사용 할 수 있다.
<sql id="userColumns"> ${alias}.id,${alias}.username,${alias}.password</sql><select id="selectUsers" resultType="map">
select
<include refid="userColumns"><property name="alias" value="t1"/></include>,
<include refid="userColumns"><property name="alias" value="t2"/></include>
from some_table t1
cross join some_table t2
</select><include>를 통해서<sql>조각을 찾아서 사용할 수 있다.
<sql id="sometable">
    ${prefix}Table
</sql>
<sql id="someinclude">
    from
    <include refid="${include_target}"/>
</sql>
<select id="select" resultType="map">
    select
    field1, field2, field3    <include refid="someinclude">
        <property name="prefix" value="Some"/>
        <property name="include_target" value="sometable"/>
    </include>
</select>- 프로퍼티 값을 전달할 수 있고, 해당 값은 내부에서 사용할 수 있다.
Result Maps
결과를 매핑할 때 테이블은 user_id 이지만 객체는 id 이다.
이 경우 컬럼명과 객체의 프로퍼티 명이 다르다.
그러면 다음과 같이 별칭( as )을 사용하면 된다.
<sql id="sometable">
    ${prefix}Table
</sql>
<sql id="someinclude">
    from
    <include refid="${include_target}"/>
</sql>
<select id="select" resultType="map">
    select
    field1, field2, field3    <include refid="someinclude">
        <property name="prefix" value="Some"/>
        <property name="include_target" value="sometable"/>
    </include>
</select>
별칭을 사용하지 않고도 문제를 해결할 수 있는데, 다음과 같이 resultMap 을 선언해서 사용하면 된다.
<resultMap id="userResultMap" type="User">
    <id property="id" column="user_id" />
    <result property="username" column="user_name"/>
    <result property="password" column="hashed_password"/>
</resultMap>
<select id="selectUsers" resultMap="userResultMap">
    select user_id, user_name, hashed_password
    from some_table    where id = #{id}
</select>
복잡한 결과매핑
MyBatis도 매우 복잡한 결과에 객체 연관관계를 고려해서 데이터를 조회하는 것이 가능하다.
이때는 <association>, <collection> 등을 사용한다.
이 부분은 성능과 실효성에서 측면에서 많은 고민이 필요하다.
JPA는 객체와 관계형 데이터베이스를 ORM 개념으로 매핑하기 때문에 이런 부분이 자연스럽지만, MyBatis에서는 들어가는 공수도 많고, 성능을 최적화하기도 어렵다.
따라서 해당 기능을 사용할 때는 신중하게 사용해야 한다.
해당 기능에 대한 자세한 내용은 공식 메뉴얼을 참고하자.
참고
결과 매핑에 대한 자세한 내용은 다음을 참고하자.
3. 요약
MyBatis를 제대로 배운 건 처음인거 같다.
이전에 다른 강의로도 사용해보고 해보긴했지만, 설정부터 테스트까지 그리고 xml에 어떻게 정의해야하는지 이번에 더 자세히 배웠던 거 같다.
그리고 어떻게 스프링이 인터페이스만 사용하고도 알아서 xml과 매핑되어서 데이터베이스로 접속돼는지도 확인해봤다.
다음 챕터는 JPA 시리즈다.
'Spring Project > Spring & Spring Boot' 카테고리의 다른 글
| 스프링 캠프 전체 영상 URL (0) | 2024.08.30 |
|---|---|
| 스프링 DB2편 - Ch05,06,07. 데이터 접근 기술 - JPA, 스프링 데이터 JPA, Querydsl (0) | 2024.08.15 |
| 스프링 DB2편 - Ch03. 데이터 접근 기술 - 테스트 (0) | 2024.08.11 |
| 스프링 DB2편 - Ch02. 데이터 접근 기술 - 스프링 JdbcTemplate (0) | 2024.08.07 |
| 스프링 DB2편 - Ch01. 데이터 접근 기술 - 시작 (0) | 2024.08.06 |