
| 일 | 월 | 화 | 수 | 목 | 금 | 토 |
|---|---|---|---|---|---|---|
| 1 | 2 | 3 | 4 | 5 | 6 | 7 |
| 8 | 9 | 10 | 11 | 12 | 13 | 14 |
| 15 | 16 | 17 | 18 | 19 | 20 | 21 |
| 22 | 23 | 24 | 25 | 26 | 27 | 28 |
- Thread
- 알고리즘
- 김영한
- Docker
- 쓰레드
- 스레드
- container
- 람다
- 도커
- Kubernetes
- 실전 자바 고급 1편
- 쿠버네티스
- mysql
- 컨테이너
- db
- 인프런
- Java IO
- 자료구조
- 멀티 쓰레드
- 자바
- 함수형 인터페이스
- 동시성
- 자바 입출력 스트림
- SQL
- lambda
- 데이터베이스
- 시작하세요 도커 & 쿠버네티스
- 도커 엔진
- java
- RDB
- Today
- Total
쌩로그
[Tool] 성능 테스트 도구 nGrinder 본문
목록
포스팅 개요
본론
2-1. nGrinder는 무엇인가
2-2. nGrinder 설치(with. 도커)
2-3. nGrinder 사용하기
2-4. 스크립트 작성
2-5. 테스트 시작참고 사이트
1. 포스팅 개요
해당 포스팅은 성능 테스트 도구인 nGrinder에 대한 포스팅이다.
nGrinder가 무엇인지,
설치 및 사용방법에 대해 알아본다.
2. 본론
2-1. nGrinder는 무엇인가
- 네이버에서 개발한 Enterpise 레벨 Java기반 성능 테스트 도구
- Agent가 반드시 필요하며, Controller는 이를 조종하는 역할을 한다.
- 분산 테스트/Web UI/Multi Tenancy 지원하고 Groovy/Jyshon으로 테스트 스크립트를 작성할 수 있다.
- 실무에서도 많이 사용되고 있다.
- 테스트 결과 레포트 UI가 심플하고 직관적이다.
- 한국어에 특화되어 있다.
- 오픈소스이다.
장점
- 트랜잭션을 자유롭게 정의할 수 있다.
- 여러 요청을 하나의 Test로 묶을 수 있다.
- 스크립트 버전을 관리할 수 있다.
- 실행한 테스트의 결과 또한 자동으로 저장 및 관리할 수 있다.
아키텍처
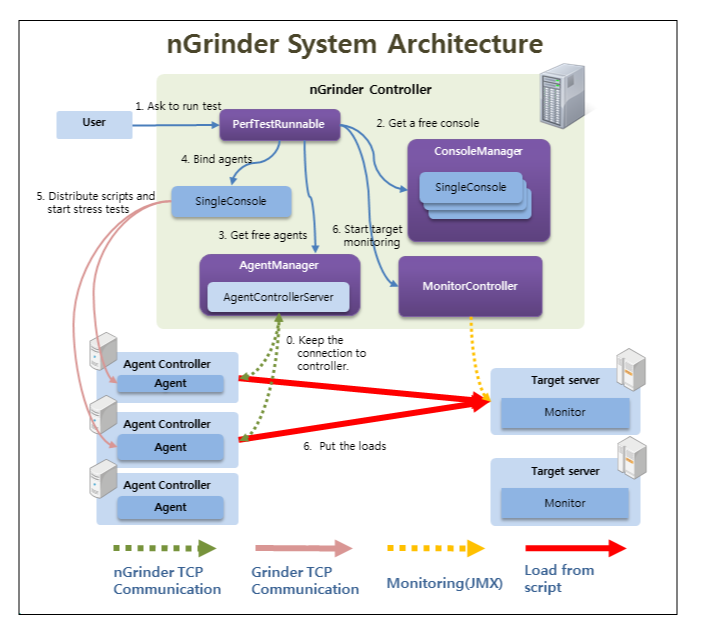
각 요소의 역할
- Controller
- 부하테스트를 위한 스크립트 관리와 Agent를 제어한다.
- 성능 테스트를 위한 웹 인터페이스를 제공한다.
- 테스트 프로세스를 조정한다
- 스크립트를 만들고 수정한다.
- Agent
- 스크립트 실행
- 에이전트 모드로 실행할 때 대상 시스템에 로드를 가하는 프로세스 및 스레드를 실행한다.
- 모니터 모드로 실행할 때 대상 시스템 성능(예: CPU/메모리)을 모니터링한다.
- Monitor : 타켓 서버의 성능 측정 (거의 사용되지 않음)
2-2. nGrinder 설치(with. 도커)
필자는 간단하게 도커로 설치했다.
설치 방법은 아래를 참고 URL을 참고하면 된다.
https://hub.docker.com/r/ngrinder/controller/
컨트롤러와 에이전트 설치
컨트롤러 설치
도커를 통해서 nGrinder/controller 의 이미지를 받아온다.
$ docker pull ngrinder/controller컨트롤러를 시작한다.
$ docker run -d -v ~/ngrinder-controller:/opt/ngrinder-controller --name controller -p 8080:80 -p 16001:16001 -p 12000-12009:12000-12009 ngrinder/controller공식 문서에 아래와 같이 나와있다.
The controller creates a data folder under /opt/ngrinder-controller to maintain test history and configuration data. In order to keep the data persistently, you should map the folder /opt/ngrinder-controller on the container to a folder on your host .

# 구글 번역
컨트롤러는 테스트 기록과 구성 데이터를 유지하기 위해 /opt/ngrinder-controller 아래에 데이터 폴더를 만듭니다. 데이터를 지속적으로 유지하려면 컨테이너의 /opt/ngrinder-controller 폴더를 호스트의 폴더로 매핑해야 합니다.
당연히 데이터를 지속해서 저장하려면 mount를 해야한다는 말이다.
포트 정보는 다음과 같다.
- 80 기본 컨트롤러 웹 UI 포트.
- 필자는 80 포트가 이미 사용중이라 8080 포트로 했다.
- 명령어상
-p 8080:80
- 16001:
- 에이전트는 이 포트를 통해 컨트롤러 클러스터에 연결한다.
- Agent와 Controller가 잘 연결되었는지 확인하는 포트
- 또한, 쉬고 있는 Agent가 Controller에게 테스트 가능 메시지를 전달하는 포트
- 12000-12029
- 12000번부터 12009번까지의 연속된 포트 범위를 매핑
- 컨트롤러는 이 포트를 통해 스트레스 테스트를 할당
에이전트 설치
에이전트에 대한 설명이다.
Install docker 1.5.0 or above on your another host. You should run your agent on different physical/virtual machine from the one where the controller is running since dockers running on the same machine cannot communicate each other without having to use an additional docker networking solution. In addition, agents might consume full resource on the machine to generate loads, so we strongly recommend to run nGrinder agent containers on the physically different machines from the one where controller is installed.

# 구글 번역
다른 호스트에 docker 1.5.0 이상을 설치합니다. 동일한 머신에서 실행되는 docker는 추가 docker 네트워킹 솔루션을 사용하지 않고는 서로 통신할 수 없으므로 컨트롤러가 실행되는 머신과 다른 물리적/가상 머신에서 에이전트를 실행해야 합니다. 또한 에이전트는 부하를 생성하기 위해 머신의 전체 리소스를 소모할 수 있으므로 컨트롤러가 설치된 머신과 물리적으로 다른 머신에서 nGrinder 에이전트 컨테이너를 실행하는 것이 좋습니다.
컨트롤러와 에이전트는 서로 다른 컨테이너에 실행하면 된다고 한다.
도커를 통해서 nGrinder/agent 의 이미지를 받아온다.
$ docker pull ngrinder/agent에이전트를 실행한다.
# 공식 문서
$ docker run -d --name agent --link controller:controller ngrinder/agent
둘 다 설치 후, docer ps 명령어를 치면 다음과 같이 나온다.
$ docker ps
CONTAINER ID   IMAGE                 COMMAND             CREATED          STATUS          PORTS                                                                                         NAMES
0ef5f39f623e   ngrinder/agent        "/scripts/run.sh"   9 seconds ago    Up 3 seconds                                                                                                  agent
5238bdb3c4b4   ngrinder/controller   "/scripts/run.sh"   40 seconds ago   Up 33 seconds   0.0.0.0:12000-12009->12000-12009/tcp, 0/tcp, 0.0.0.0:16001->16001/tcp, 0.0.0.0:8080->80/tcp   controller
2-3. nGrinder 사용하기
위의 구성이 끝났다면, localhost:[포트] 로 접속해보자.
그럼 아래와 같이 나온다.
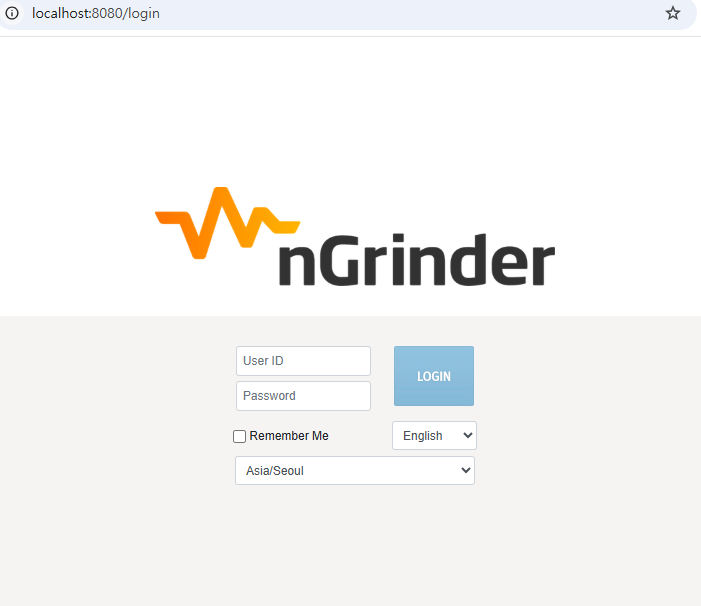
초기 ID/PW는 admin/admin이다.
참고로 보는 바와 같이 한국어 설정이 가능하다.

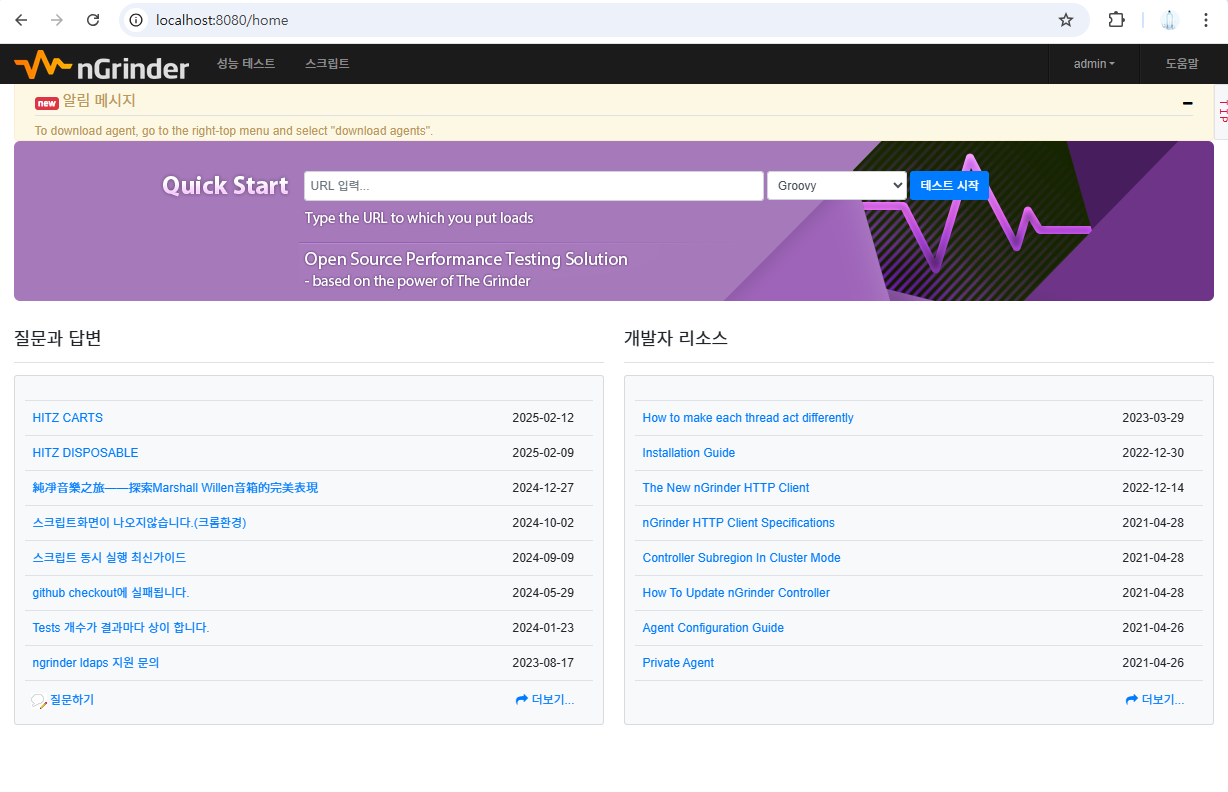
접속하면 아래와 같이 나온다.
상단 우측에 admin 에서 에이전트 관리로 간다.
그럼 실행되고 있는 agent를 확인할 수 있다.
(바로 보면 안 나올 수도 있다. 조금만 여유를 가지고 기다리자.)
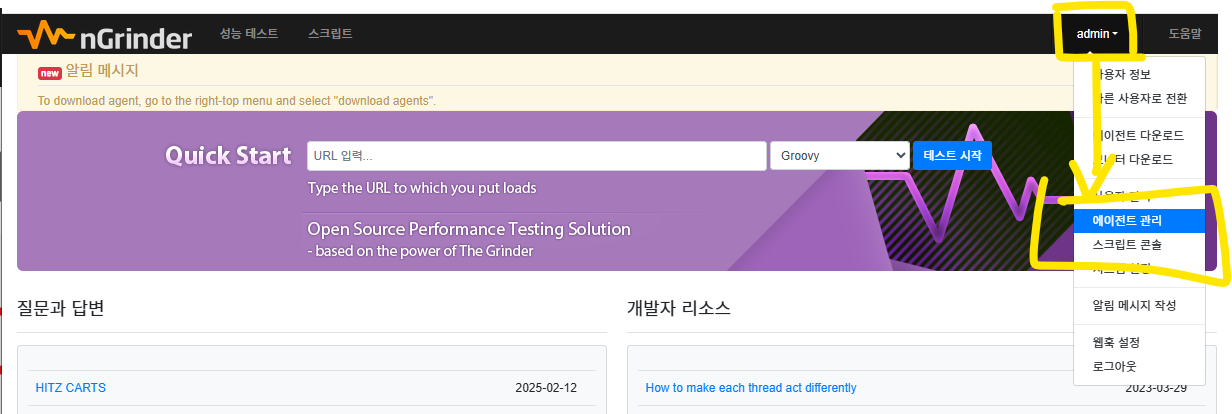

- 만약 나오지 않으면 controller와 agent의 컨테이너를 정지하고, 다시 시작해보자.
2-4. 스크립트 작성
스크립트를 작성하자.
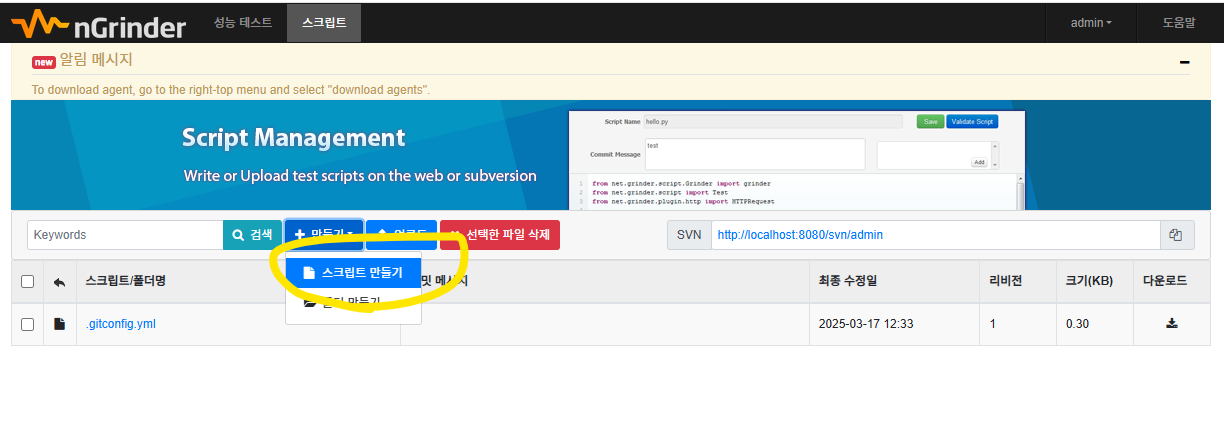
만들기를 하면 다음과 같이 나온다.
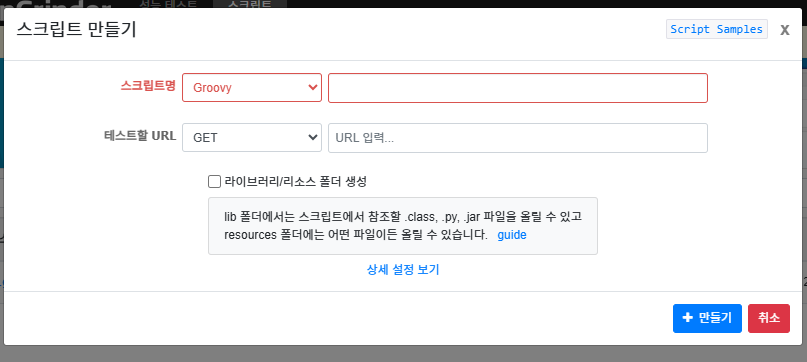
스크립트명에는 테스트 이름을
테스트할 URL에는 테스트할 URL을 적으면 된다.
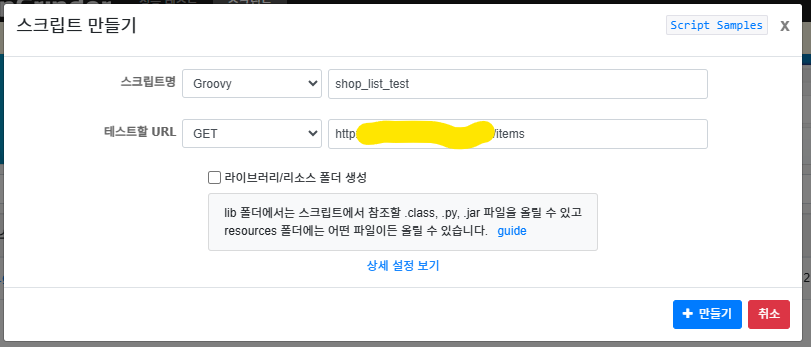
나는 내가 올린 앱에서 list를 테스트할 예정이다.
나는 아래처럼 작성했다.
만들기를 하면 아래와 같은 sample 스크립트가 만들어진다.
import static net.grinder.script.Grinder.grinder
import static org.junit.Assert.*
import static org.hamcrest.Matchers.*
import net.grinder.script.GTest
import net.grinder.script.Grinder
import net.grinder.scriptengine.groovy.junit.GrinderRunner
import net.grinder.scriptengine.groovy.junit.annotation.BeforeProcess
import net.grinder.scriptengine.groovy.junit.annotation.BeforeThread
// import static net.grinder.util.GrinderUtils.* // You can use this if you're using nGrinder after 3.2.3
import org.junit.Before
import org.junit.BeforeClass
import org.junit.Test
import org.junit.runner.RunWith

import org.ngrinder.http.HTTPRequest
import org.ngrinder.http.HTTPRequestControl
import org.ngrinder.http.HTTPResponse
import org.ngrinder.http.cookie.Cookie
import org.ngrinder.http.cookie.CookieManager

/**
* A simple example using the HTTP plugin that shows the retrieval of a single page via HTTP.
*
* This script is automatically generated by ngrinder.
*
* @author admin
*/
@RunWith(GrinderRunner)
class TestRunner {

    public static GTest test
    public static HTTPRequest request
    public static Map<String, String> headers = [:]
    public static Map<String, Object> params = [:]
    public static List<Cookie> cookies = []

    @BeforeProcess
    public static void beforeProcess() {
        HTTPRequestControl.setConnectionTimeout(300000)
        test = new GTest(1, "xxx.com")
        request = new HTTPRequest()
        grinder.logger.info("before process.")
    }

    @BeforeThread
    public void beforeThread() {
        test.record(this, "test")
        grinder.statistics.delayReports = true
        grinder.logger.info("before thread.")
    }

    @Before
    public void before() {
        request.setHeaders(headers)
        CookieManager.addCookies(cookies)
        grinder.logger.info("before. init headers and cookies")
    }

    @Test
    public void test() {
        HTTPResponse response = request.GET("http://xxx.com/items", params)

        if (response.statusCode == 301 || response.statusCode == 302) {
            grinder.logger.warn("Warning. The response may not be correct. The response code was {}.", response.statusCode)
        } else {
            assertThat(response.statusCode, is(200))
        }
    }
}
그루비 문법사이트는 다음과 같다.
이후 상단 우측에 검증을 한 후 정상이면, 저장/닫기 를 눌러 나온다.
2-5. 테스트 시작
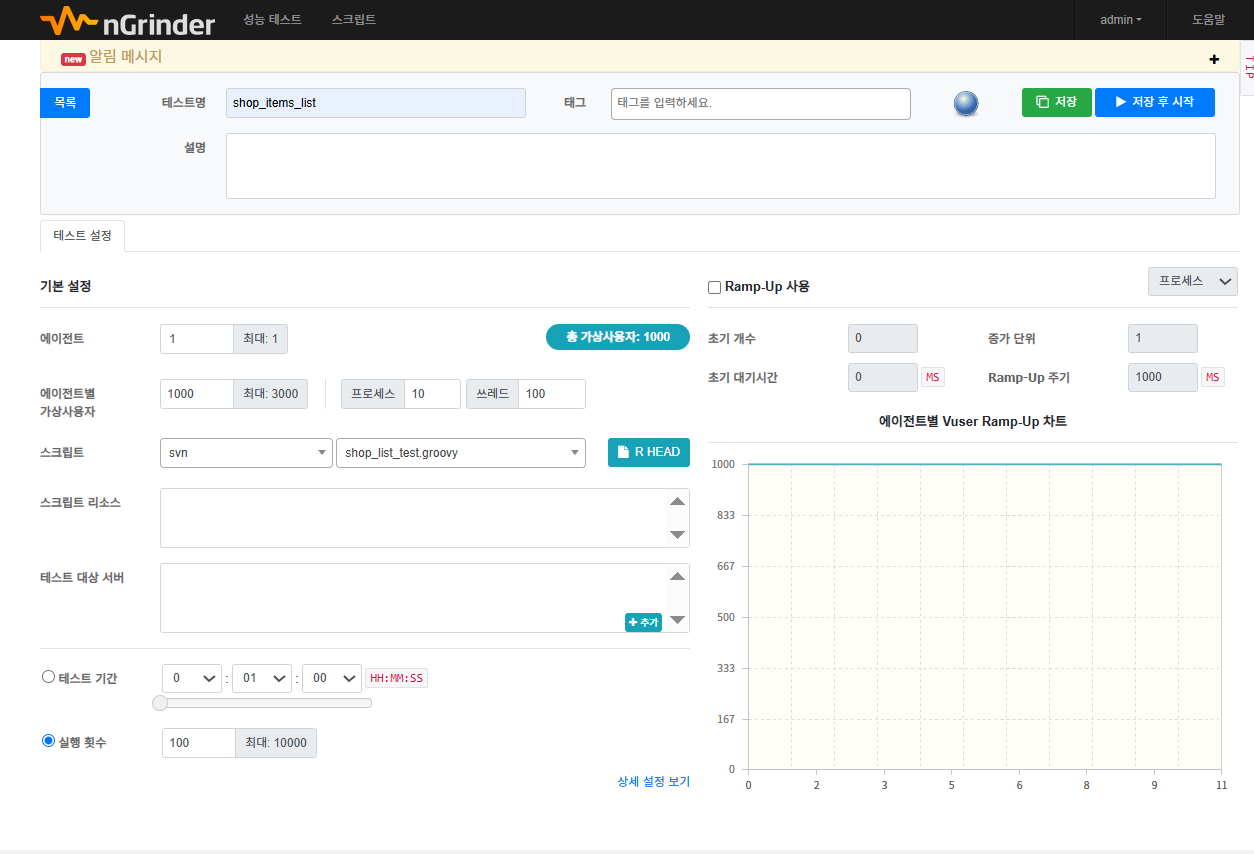
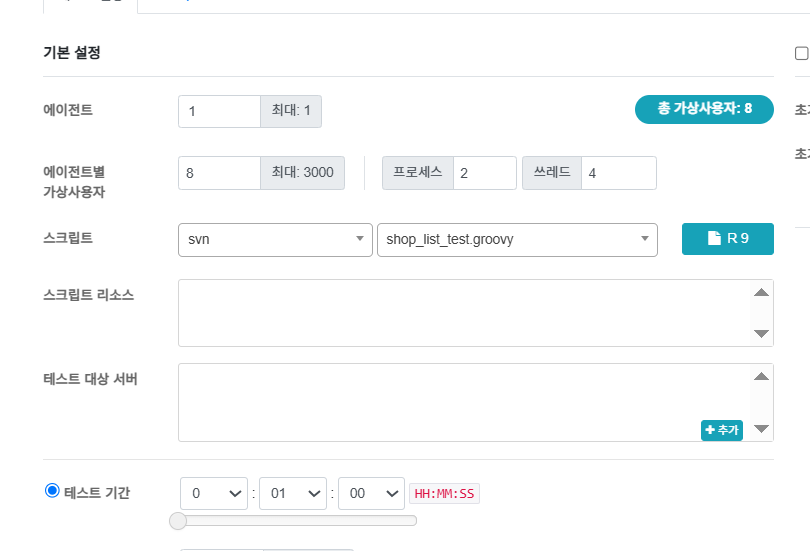
이후 상단의 성능 테스트로 들어가서 테스트 생성을 누르면 아래와 같이 나온다.
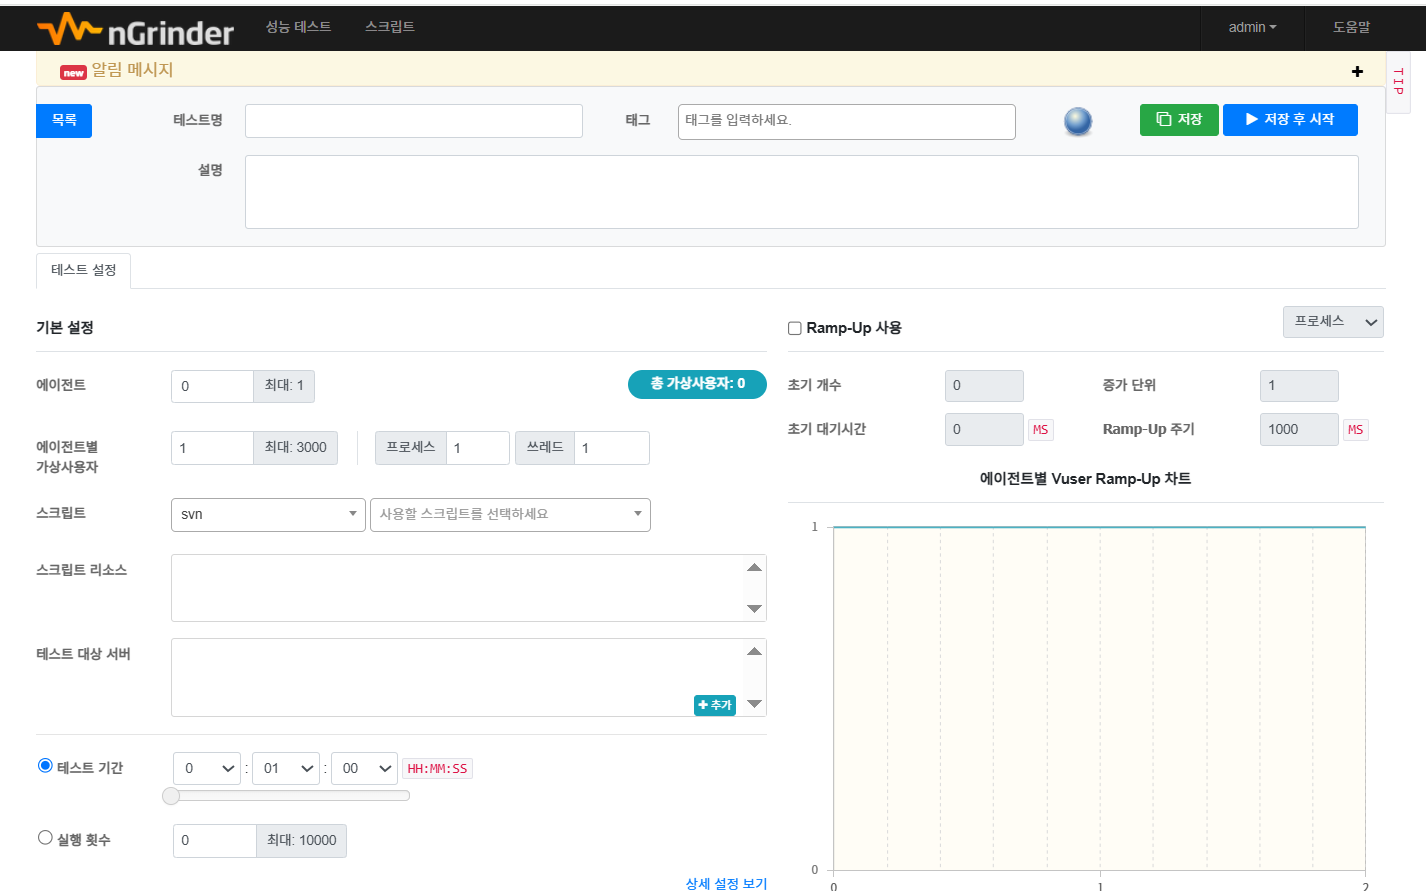
필자는 아래와 같이 작성하고, 실행(우측 상단의 저장 후 시작 - 지금 시작)했다.
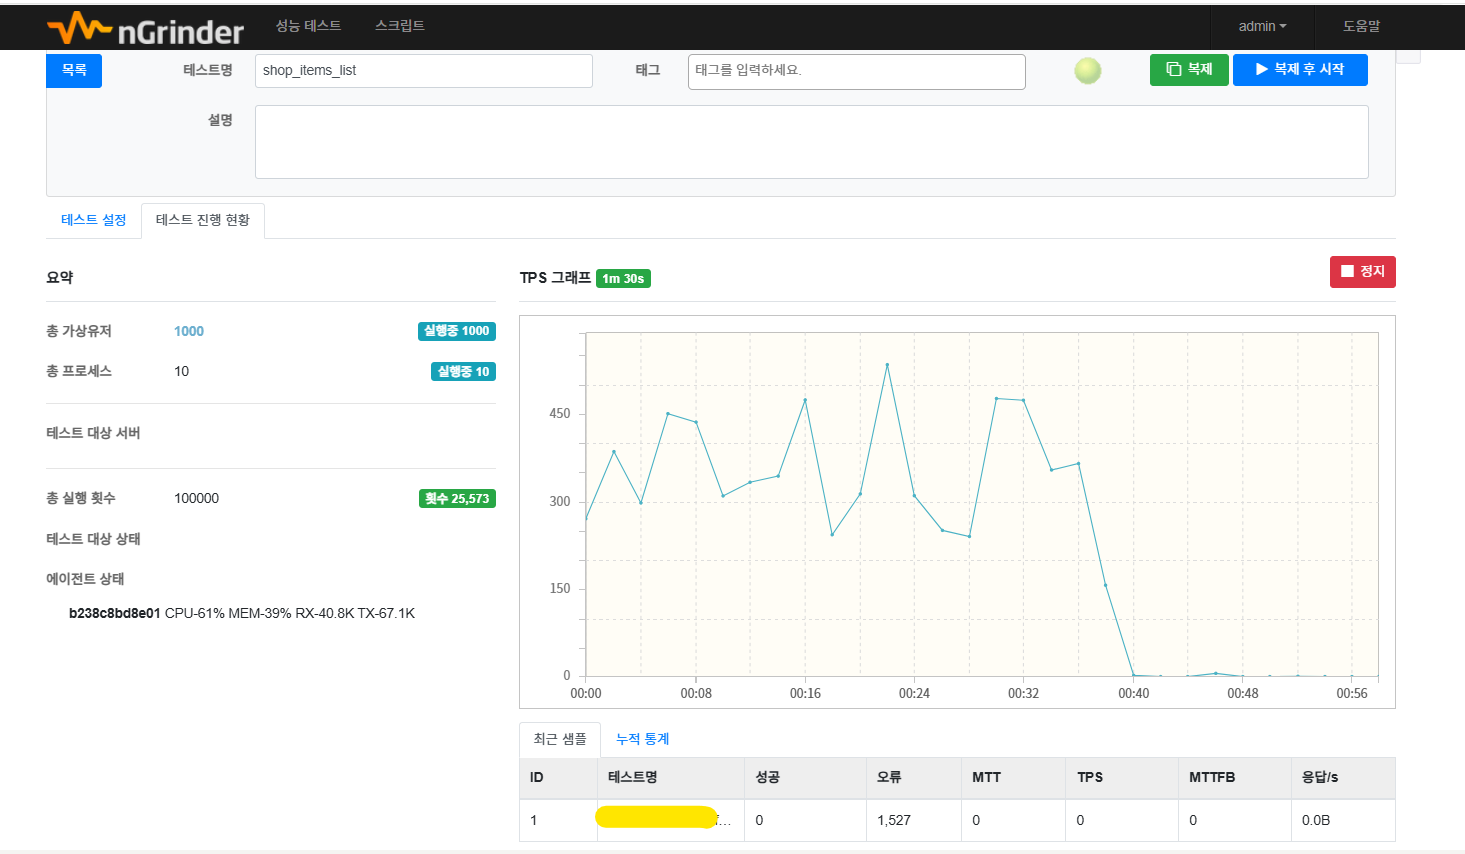
이후 아래와 같이 테스트 중임을 직관적으로 알 수 있다.
테스트가 끝나면 아래와 같이 결과가 나온다.
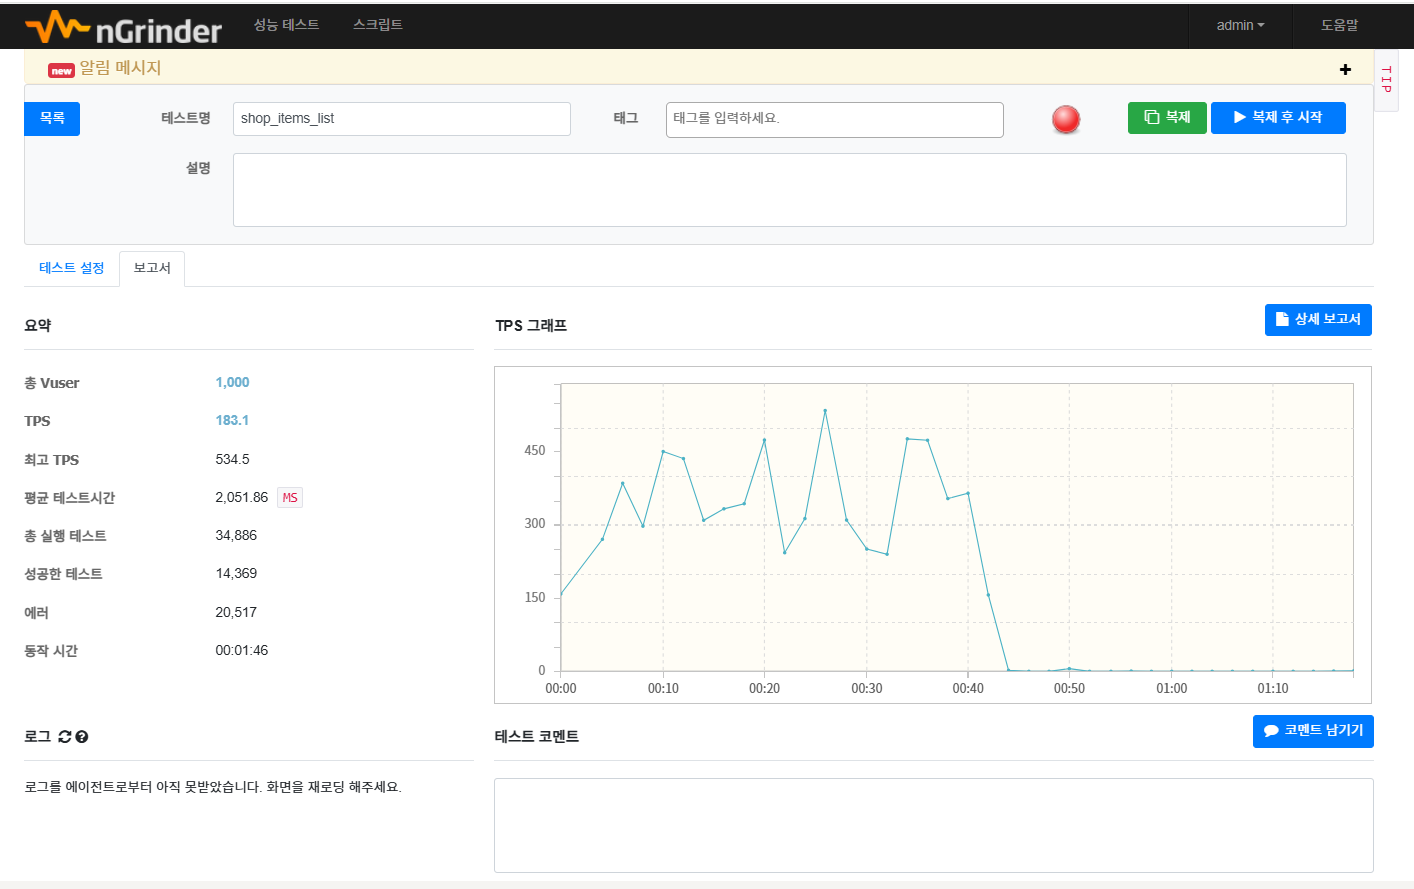
상세 보고서를 통해 그래프를 상세하게 볼 수 있으며,
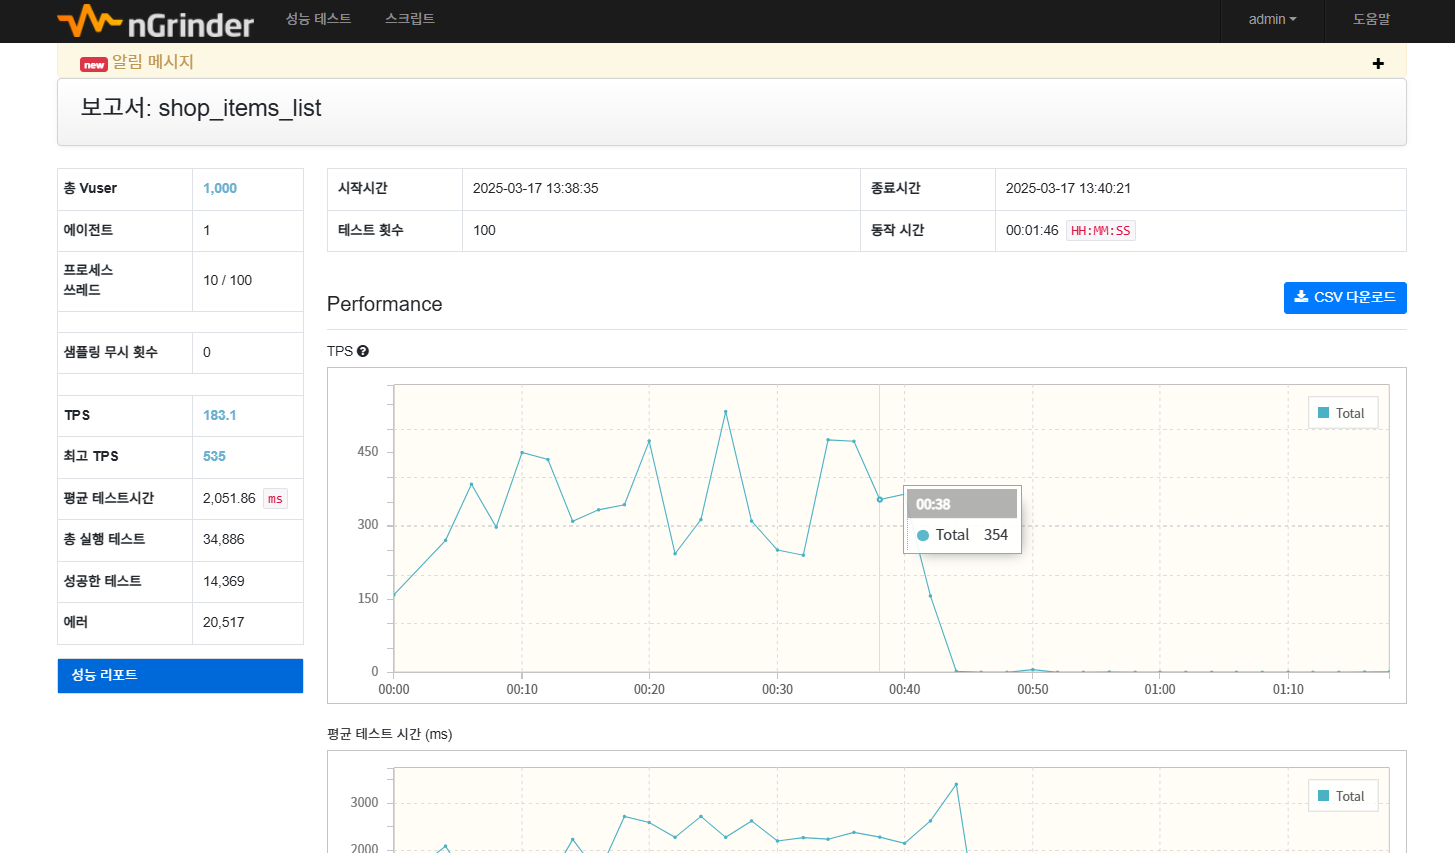
TPS, 평균 테스트 시간, 첫 번째 바이트 평균 도달 시간, VUser(가상 유저), 오류 등을 볼 수 있고,
요약 아래에는 로그를 볼 수 있다.
(결과 페이지가 나온 후 조금 있다가 생성된다.)
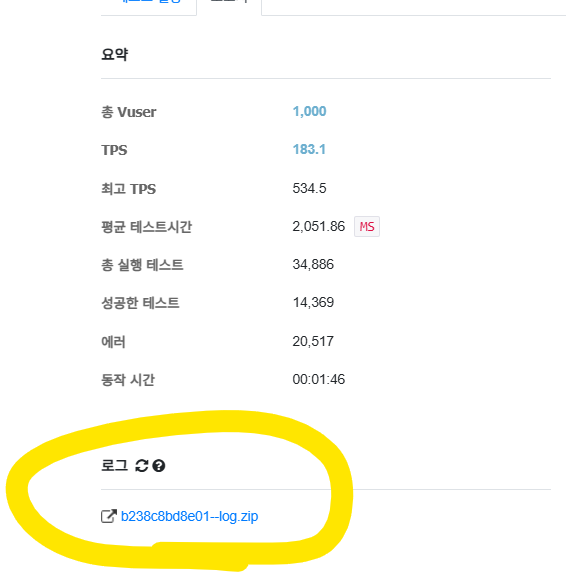
로그를 보면,,,
필자가 에이전트 가상 사용자 1000명(프로세스 10, 쓰레드 100)을 줬는데, 부하가 겁나 걸렸는지.. 커넥션 거부로그가 많다.
2025-03-17 04:40:20,553 INFO  before. init headers and cookies
2025-03-17 04:40:20,561 ERROR java.util.concurrent.ExecutionException: java.net.ConnectException: Connection refused
java.net.ConnectException: Connection refused
    at org.apache.hc.core5.reactor.InternalConnectChannel.onIOEvent(InternalConnectChannel.java:64)
    at org.apache.hc.core5.reactor.InternalChannel.handleIOEvent(InternalChannel.java:51)
    at org.apache.hc.core5.reactor.SingleCoreIOReactor.processEvents(SingleCoreIOReactor.java:179)
    at org.apache.hc.core5.reactor.SingleCoreIOReactor.doExecute(SingleCoreIOReactor.java:128)
    at org.apache.hc.core5.reactor.AbstractSingleCoreIOReactor.execute(AbstractSingleCoreIOReactor.java:85)
    at org.apache.hc.core5.reactor.IOReactorWorker.run(IOReactorWorker.java:44)
2025-03-17 04:40:20,561 INFO  before. init headers and cookies
2025-03-17 04:40:20,574 ERROR java.util.concurrent.ExecutionException: java.net.ConnectException: Connection refused
java.net.ConnectException: Connection refused
    at org.apache.hc.core5.reactor.InternalConnectChannel.onIOEvent(InternalConnectChannel.java:64)
    at org.apache.hc.core5.reactor.InternalChannel.handleIOEvent(InternalChannel.java:51)
    at org.apache.hc.core5.reactor.SingleCoreIOReactor.processEvents(SingleCoreIOReactor.java:179)
    at org.apache.hc.core5.reactor.SingleCoreIOReactor.doExecute(SingleCoreIOReactor.java:128)
    at org.apache.hc.core5.reactor.AbstractSingleCoreIOReactor.execute(AbstractSingleCoreIOReactor.java:85)
    at org.apache.hc.core5.reactor.IOReactorWorker.run(IOReactorWorker.java:44)
2025-03-17 04:40:20,574 INFO  before. init headers and cookies
2025-03-17 04:40:20,657 ERROR java.util.concurrent.ExecutionException: java.net.ConnectException: Connection refused
java.net.ConnectException: Connection refused
    at org.apache.hc.core5.reactor.InternalConnectChannel.onIOEvent(InternalConnectChannel.java:64)
    at org.apache.hc.core5.reactor.InternalChannel.handleIOEvent(InternalChannel.java:51)
    at org.apache.hc.core5.reactor.SingleCoreIOReactor.processEvents(SingleCoreIOReactor.java:179)
    at org.apache.hc.core5.reactor.SingleCoreIOReactor.doExecute(SingleCoreIOReactor.java:128)
    at org.apache.hc.core5.reactor.AbstractSingleCoreIOReactor.execute(AbstractSingleCoreIOReactor.java:85)
    at org.apache.hc.core5.reactor.IOReactorWorker.run(IOReactorWorker.java:44)
2025-03-17 04:40:20,658 INFO  before. init headers and cookies
2025-03-17 04:40:20,657 ERROR java.util.concurrent.ExecutionException: java.net.ConnectException: Connection refused
java.net.ConnectException: Connection refused
    at org.apache.hc.core5.reactor.InternalConnectChannel.onIOEvent(InternalConnectChannel.java:64)
    at org.apache.hc.core5.reactor.InternalChannel.handleIOEvent(InternalChannel.java:51)
    at org.apache.hc.core5.reactor.SingleCoreIOReactor.processEvents(SingleCoreIOReactor.java:179)
    at org.apache.hc.core5.reactor.SingleCoreIOReactor.doExecute(SingleCoreIOReactor.java:128)
    at org.apache.hc.core5.reactor.AbstractSingleCoreIOReactor.execute(AbstractSingleCoreIOReactor.java:85)
    at org.apache.hc.core5.reactor.IOReactorWorker.run(IOReactorWorker.java:44)
아래와 같이 사용자를 대폭 줄이고 확인해보면,
커넥션의 오류 없이 다음과 같이 로그를 볼 수 있다.
2025-03-17 05:08:16,514 INFO  http://xxx/items -> 200 , 2381 bytes
2025-03-17 05:08:16,544 INFO  http://xxx/items -> 200 , 2381 bytes
2025-03-17 05:08:16,549 INFO  http://xxx/items -> 200 , 2381 bytes
2025-03-17 05:08:16,628 INFO  http://xxx/items -> 200 , 2381 bytes
2025-03-17 05:08:16,701 INFO  http://xxx/items -> 200 , 2381 bytes
2025-03-17 05:08:16,702 INFO  http://xxx/items -> 200 , 2381 bytes
2025-03-17 05:08:16,748 INFO  http://xxx/items -> 200 , 2381 bytes
2025-03-17 05:08:16,785 INFO  http://xxx/items -> 200 , 2381 bytes
2025-03-17 05:08:16,788 INFO  http://xxx/items -> 200 , 2381 bytes
2025-03-17 05:08:16,825 INFO  http://xxx/items -> 200 , 2381 bytes
2025-03-17 05:08:16,876 INFO  http://xxx/items -> 200 , 2381 bytes
2025-03-17 05:08:16,878 INFO  http://xxx/items -> 200 , 2381 bytes
2025-03-17 05:08:16,903 INFO  http://xxx/items -> 200 , 2381 bytes
2025-03-17 05:08:16,918 INFO  http://xxx/items -> 200 , 2381 bytes
2025-03-17 05:08:16,931 INFO  http://xxx/items -> 200 , 2381 bytes
2025-03-17 05:08:16,940 INFO  http://xxx/items -> 200 , 2381 bytes
2025-03-17 05:08:16,968 INFO  http://xxx/items -> 200 , 2381 bytes
2025-03-17 05:08:16,972 INFO  http://xxx/items -> 200 , 2381 bytes
2025-03-17 05:08:16,991 INFO  http://xxx/items -> 200 , 2381 bytes
2025-03-17 05:08:17,013 INFO  http://xxx/items -> 200 , 2381 bytes
2025-03-17 05:08:17,021 INFO  http://xxx/items -> 200 , 2381 bytes
2025-03-17 05:08:17,107 INFO  http://xxx/items -> 200 , 2381 bytes
2025-03-17 05:08:17,110 INFO  http://xxx/items -> 200 , 2381 bytes
2025-03-17 05:08:17,172 INFO  http://xxx/items -> 200 , 2381 bytes
2025-03-17 05:08:17,252 INFO  http://xxx/items -> 200 , 2381 bytes
2025-03-17 05:08:17,339 INFO  http://xxx/items -> 200 , 2381 bytes
2025-03-17 05:08:17,339 INFO  http://xxx/items -> 200 , 2381 bytes
2025-03-17 05:08:17,340 INFO  http://xxx/items -> 200 , 2381 bytes
2025-03-17 05:08:17,357 INFO  received a stop message
2025-03-17 05:08:17,492 INFO  http://xxx/items -> 200 , 2381 bytes
2025-03-17 05:08:17,492 INFO  http://xxx/items -> 200 , 2381 bytes
2025-03-17 05:08:17,493 INFO  http://xxx/items -> 200 , 2381 bytes
2025-03-17 05:08:17,494 INFO  http://xxx/items -> 200 , 2381 bytes
2025-03-17 05:08:17,498 INFO  shut down
2025-03-17 05:08:17,498 INFO  finished 1164 runs
2025-03-17 05:08:17,498 INFO  shut down
2025-03-17 05:08:17,498 INFO  finished 1124 runs
2025-03-17 05:08:17,499 INFO  shut down
2025-03-17 05:08:17,499 INFO  shut down
2025-03-17 05:08:17,499 INFO  finished 1164 runs
2025-03-17 05:08:17,499 INFO  finished 1228 runs
2025-03-17 05:08:17,511 INFO  elapsed time is 55744 ms
2025-03-17 05:08:17,511 INFO  Final statistics for this process:
2025-03-17 05:08:17,543 INFO
             Tests        Errors       Mean Test    Test Time    TPS          Mean         Response     Response     Mean time to Mean time to Mean time to
                                       Time (ms)    Standard                  response     bytes per    errors       resolve host establish    first byte
                                                    Deviation                 length       second                                 connection
                                                    (ms)

Test 10      4680         0            47.36        68.29        83.96        2381.00      199897.39    0            0.00         20.83        46.08         "nosum.nineonesoft.com"

Totals       4680         0            47.36        68.29        83.96        2381.00      199897.39    0            0.00         20.83        46.08

  Tests resulting in error only contribute to the Errors column.
  Statistics for individual tests can be found in the data file, including
  (possibly incomplete) statistics for erroneous tests. Composite tests
  are marked with () and not included in the totals.
애플리케이션이 올라간 VM이 CPU 가 2코어라 그런가 8명까지는 괜찮은데, 10명부터는 에러가 발생한다....
지금까지 nGrinder 사용법에 대해 알아봤다.
3. 참고 사이트
https://naver.github.io/ngrinder/
https://github.com/naver/ngrinder/wiki/Installation-Guide
https://hub.docker.com/r/ngrinder/controller/
https://afuew.tistory.com/18#%E2%AD%90%20%EC%84%B1%EB%8A%A5%20%ED%85%8C%EC%8A%A4%ED%8A%B8%20(Performance%20Test)-1
'Tool' 카테고리의 다른 글
| Postman으로 API 순차적으로 테스트하기 (1) | 2025.04.16 |
|---|---|
| 인텔리제이 꿀팁 ( 계속 추가 예정 ) (2) | 2025.02.05 |
| 포스트맨 전역변수 선언 (0) | 2023.05.17 |
